Wednesday, August 31, 2016

Color Blooms Blog Hop


Hello! Today we are hopping along sharing the newly released Color Blooms Coloring Book created by the amazing owner and creator, Shery Russ and it is wonderful!!!  In this blog hop we will show you pictures of pages we have colored in the book and the projects we've created with them.  Here are my before pictures... ( I've used Prismacolor Premier Colored Pencils )


And with this colored page and image I was able to create a set of 5 greeting cards...


 (Supplies Used from STAMPlorations with the coloring pages... Awesome Word Die - CUTploration, Happy Word Die - CUTploration, Crazy Double Running Stitch Rectangle Nesting Dies, Blooming Buds, New Beginnings, Sentiment Builders: Happy)

Now there can't be a blog hop without some prizes so here are the details on how to get your name entered for a chance to win one of the prizes...
  • leave comments on the STAMPlorations blog and on designers’ blogs
  • participate in the linky party by downloading the Color Blooms page sampler, creating a project out of it, and then linking it up.
  • like, comment, and tag a friend on the Facebook page post.
prizes:
  • ONE (1) commenter randomly drawn from our Facebook page will win a $10 gift certificate for herself and a $10 gift certificate for one friend she/he tags in their comment
  • ONE (1) commenter randomly drawn from all comments left on the STAMP blog and designers' blogs will win a $10 gift certificate
  • ONE (1) participant randomly drawn from the linky party entries will win a copy of Color Blooms and a $15 gift certificate
Thank you so much for stopping by today and I wish you the best of luck!
Happy Crafting!
Lisa

Bunch of Birthday Wishes

Hello!  Today you will find me sharing a fun Birthday card over on the Mint Owl Studio Blog...


Hope to see you over there!
Happy Crafting!
Lisa

Supplies Used:
Mint Owl Studio Stamps: Party Pals, Birthday Bash
Frame Die
Copic Markers
Memento Ink

Thursday, August 25, 2016

Papertrey Ink August Blog Hop Challenge

Hello beautiful crafting people!!!  I'm happy to get a chance to pop in here today and share a card I've created for the Papertrey Ink August Blog Hop!  It was so fun to just bust out some sets and have fun, not to mention the inspiration photo was gorgeous...


To create this card I started with stamping and embossing the Peonies On Parade Stamp Set in a metallic bronze embossing powder onto watercolor card stock.  I then used various PTI BYE Inks: Melon Berry, Sweet Blush, Ripe Avocado, and Classic Kraft to watercolor my images with.  I then stamped my sentiment from the Graceful Greetings in Smokey Shadow Ink onto a panel and added white embossing paste on the top left corner and bottom right corner of this panel to mimic texture in the inspirational photo.  I then trimmed my flowers and leaves and adhered them to the cardbase with a mix of glue adhesive and foam adhesive.  I then distressed the edges, added clear sequins and layered it at an angle onto a panel of Melon Berry Card Stock.

Here is a look at the inspirational photo:


Thanks so much for taking the time to visit me today and Happy Crafting!
Lisa

Wednesday, August 24, 2016

Get Well Soon with Mint Owl Studio

Hello!  This is my second post for the day so make sure you scroll down to see my peek at some cute DIY Planner Tags!

Now I'm going to share a Get Well Card that I've created with new Mint Owl Studio's newly release dies and stamps, yay!!!


I'm just so happy with how this card turned out!  I love looking at color pallets on pinterest and I knew this one would work well for a guy or girl.  To create this card I started with the new Packaged Pretty Die Cuts and die cut the square several times in each color.  I then laid them out onto my cardbase and trimmed the excess on all sides.  Next I stamped the sentiment from the Banner's 1 Stamp Set on one of the squares and finished it with ribbon and enamel dots.

Head over to the Mint Owl Studio Blog for more inspiration!
Happy Crafting!
Lisa

Planner Tags with CutCardStock.com

Hello!  Today you will find a fun DIY tutorial that I've created on how to make your own Watercolored Planner Tags on the www.CutCardStock.com Blog!  Woot woot!  I'll share a peek, but you need to head over to their blog to see the full how to, and make sure you leave a little hello so I can leave you some love back!


Thanks for swinging by and Happy Crafting!
Lisa

Saturday, August 20, 2016

A Birthday Layout with New Mint Owl Studio!!!

Today I am sharing a layout created with lots of the new Mint Owl Studio Stamps on their blog today.  It was so much fun to create my own designer paper look and embellishments...


For full details on how this came together make sure you stop by their blog!  Also, don't forget to hop in our new release hop that started yesterday!  One person that comments will win the entire new release!

Happy Crafting!!!
Lisa

Friday, August 19, 2016

Mint Owl Studio New Release Blog Hop!!!

Hello!


Welcome to our Release Day Blog Hop!  We are starting something new for release day's with this blog hop and we hope it gets you more excited for the new sets.  Woo hoo!!!  This release is full of awesomeness and I just know you are going to love it!  Today I am sharing a project using the new Party Pals Stamp Set and the Gift Box Die set ( that's right she's releasing dies too, yay!!! ) to create a super cute interactive card...


Isn't this fun?!  Once I realized that the little boy and girl in this set were as tall as the box lid the idea for this card just fell into place!  I die cut everything out of the Birthday Stack by DCWV and set to the side.  I then stamped the girl and banner and colored them in with Copics.  After cutting them all out I began putting the front of my card together.  I started by adhering my "floor" and stamping it with the sentiment.  I then adhered the gift box with thin foam adhesive down 3 sides of it.  I then added a strip of paper behind my girl so I would have some way to make the bow stick up and be attached to her.  I placed her down in the box holding her little banner, and ta - da!  Throw on some confetti cuts and you have yourself a card!


Make sure to hop along with our design team and leave comments on their blogs for your chance to win the entire new release!  All of the details are at the end of this post.


Hop Order:
Lisa - You are here
Larissa - Go here next :) 

We're also giving away the entire new release!  Want to know how to win?  All you have to do is comment on this blog and each of the blogs on the hop.  The winner will be randomly chosen from one of the blogs, so the more blogs you comment on, the better your chance is to win!  Good luck!


Happy Crafting and Happy Hopping!
Lisa


Thursday, August 18, 2016

STAMPlorations CAS With a Twist of Gold

Hello!  It is time for your mid-month reminder for the CAS Challenge over at STAMPlorations.  And remember this month we added the twist of gold...


To create this card I started with a black panel and stencil.  I then went over the stencil with versa mark ink, removed the stencil and used a brush to brush on Gold Perfect Pearls.  I layered the panel onto teal card stock on an angle.  Next I die cut the Happy from Gold foil paper by DCWV and two layers of it in black.  I adhered all of the happy cuts together with the gold on top for dimension.  Added this to the front of the card along with some gold sequins.  I felt like the inside needed a little love too, so I stamped a sentiment on the inside with black ink and added a strip of the gold foil paper to the bottom.

I hope we will see you join us this week!  Here are a few rules to consider when joining:
  • Players can link up to 3 CAS cards.
  • Players can enter a CAS card with or without the optional color twist.
  • Non-STAMPlorations products are OK
  • There will be badges for the winner and top picks as voted by the design team 
  • 1 winner drawn from those who use the color twist will win a $10 gift certificate
Happy Crafting!
Lisa

DIY Rossets by DCWV... I'm In LOVE!!!

Ok, I just have to gush for a minute that I LOVE DCWV (like you may not have already know that, right?), and their attention to what their customer wants is always spot on!  Just like these new DIY stacks that are available at Michael's stores... they seriously have made it so easy by perforating the pieces you need to make the projects they show on the front covers!  Take a look at how easily these DIY Folded Fans went together...

Step 1: The paper comes pre-scored as show in the picture.  All I did was use a diecut along one side. I then did this same step for 5 different sheets. ( You can cut the papers down to make smaller paper fans as you'll see in my final picture, but I wanted to create large ones and this require 5 of the sheets in the stack)

Step 2: Next you will need to "fan" the paper by folding back and forth along the provided score lines, as shown in the photo below.  Do this for all 5 sheets.

Step 3: Using a hot glue gone you will glue all 5 sheets together forming a circle.

Step 4: Press the top part of your circle down and in.  I will warn you this is the tricky part (not hard just tricky), but once you get the hang of it the rest of them will go together smoothly.  You will need a circle to hot glue onto the back of your fan to keep it in place and for durability.  I chose a circle die that was large enough to do both.

Step 5: You may choose to layer this fan with another smaller fan or with another circle on the front.  These will also require hot glue to stay together.

Ta-da!  Now you have yourself some beautiful fans for decorating your home and or for any party!  Try experimenting with mixing papers, various edge punches and layering with unique shapes.  The options are endless and this stack makes you feel accomplished with very little work!  Show us what you are creating with your DCWV DIY Stacks!


Happy Crafting!
Lisa

Supplies Used:

DCWV DIY STACK: Folded Fans
Glue Gun
Paper Edge Punchers by Fishers®/Martha Stewart Crafts
Circle Punches/dies

Wednesday, August 17, 2016

Callin' All Sistah's Blog Hop... *Giveaways too!


Hello!  It is the 17th of the month, and it is time for our Monthly Callin' All Sistahs Blog Hop, and this time we are really focusing on Remindin' All Sistahs to perform their monthly breast exam.  We don't want anything to happen to those girls, and this is a fun way to remind us why we check, when it is time to check, and to get in the habit of checking ourselves so we can stay on top of any differences we may find.

Now that we've gotten some of the important talk out of the way let's see a cute little card to help remind us all to check...


To create this card I started by stamping the sentiments from the Callin' All Sistah's Stamp Set  on a panel over and over with the help of my MISTI and light pink ink.  I then die cut the ribbon from the Ruffled Ribbon Fri-die  out of the center of my panel and propped it up with foam adhesive.  I then die cut the girl sentiment from the Sistah's Fri-dies in black and adhered it to the center of the ribbon.  Finally, I added some pink sequins.

Some more info. on this hop:
Words from Michele Owner of CAS-ual Fridays Stamps: " We hop on the 17th of each month (the anniversary of the day I discovered my own lump) to promote the importance of early detection and to remind our sistahs to do their self breast exams. 
It's important to me to be able to give back and pay it forward, so 50% of the profits from my special Calling All Sistahs Collection are donated to Nationalbreastcancer.org
Nearly all of us has been touched by this terrible disease either personally or through someone we love, and It is my sincere hope that we lose no more of our sistahs to it."

And here is the full hop list in case you get lost along the way! Leave comments on as many as you can for your chance to win 1 of 3 $15 gc to the store!
Lisa Lahiff:                                           -YOU ARE HERE
http://lisascreativeniche.blogspot.com/
Penny Ward                                        -GO HERE NEXT
http://www.pennywardink.com/…/08/remind-sistah-blog-hop.html

And here's a coupon code just for you too!


Happy Crafting!
Lisa

Sunday, August 14, 2016

Sea You Soon by Mini Guest Designer

Hello!  Today I have a special guest designer popping by my blog, whom happens to be my 5 year old daughter.  When I read to her the glitter challenge for the Kids Challenge at Simon Says Stamp she couldn't wait to break out my crafting supplies and get busy...


And the end result...


I just love it!  I love that she has so much fun making cards too and that I have someone to ohhh and ahhhhh at new products and goodies.

She used the Mint Owl Studio Stamps for her card, metallic colored pencils and various Martha Stewart Glitter.

Thanks so much for stopping by and for any love you may leave for Madeline, I know she'll be tickled pink to hear from you!
Happy Crafting!
Lisa

Saturday, August 13, 2016

Thanks... Ellen Hutson Pin-Sights Challenge

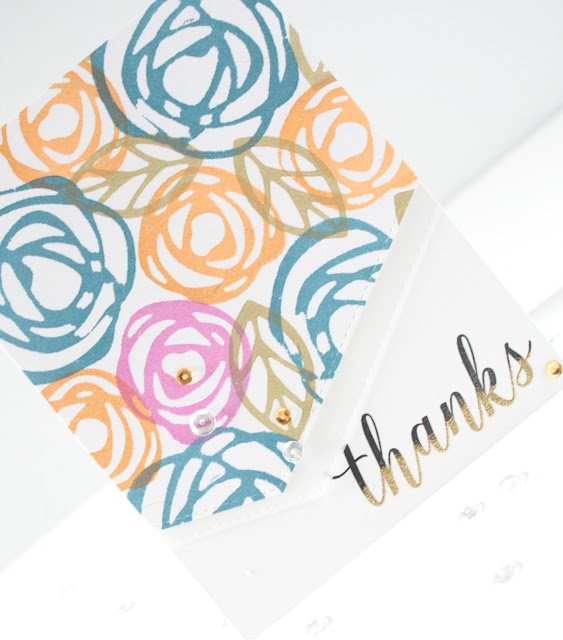
Hello!  I should say good evening as it is much later than when I normally post, but I just to get a minute to post a card I've created for the new GD call for the Ellen Hutson Pin-Sights Challenge, woot woot!  Recently I haven't had any time to get in my craft room as I have had some minor surgery on my foot that has turned out to be more painful than I thought it would be. Insert sad face.  But I made it my mission ( with some pain pill help, hehehe! ) to get a card made in time for the Guest Designer call, because it would be an amazing opportunity for any crafter.  Whew, now enough chit chat and time for some crafty fun...


To create this card I used my Essentials by Ellen Bold Blossom Stand Alone dies to make my own stamps out of craft foam :) And it worked! Woo hoo!  I have a few photos to share on these as well...


After die cutting the roses and leaf images out of white craft foam, I ran them through my Xyron Create a Sticker Machine and adhered them to my clear blocks.  I then inked them up with Memento Luxe Ink.  I haven't used these inks in forever, but I LOVE how bold the coverage was and it just seemed to fit using craft foam with a soft foam like ink pad.

Once my panel was completely stamped and set to dry I die cut the bottom with a My Favorite Things Stitched Basic Edges die.  I then chose to die cut a piece of vellum with that same edge die and layered it slightly under the stamped panel.

Finally, for the sentiment I stamped the thanks from the Fancy Thanks by Julie Stamp Set from the Essentials By Ellen Collection with black Luxe Ink and embossed just the bottom half with gold embossing powder.  And of course I needed some Pretty Pink Posh Bling to top it all off.


Thanks so much for stopping by and Happy Crafting!
Lisa
 
BLOGGER TEMPLATE BY DESIGNER BLOGS