Friday, July 31, 2015

The Alley Way Stamps August Blog Hop

Hello!!!! *Insert Happy Dancing and yays!* It is time for The August Alley Way Stamps Blog Hop, woot woot!  The sets this month are going to blow you away!  I just love them so much!  Today I am sharing a card using the Unique Peek Stamp Set, which also happens to be August's free set with any $40 purchase, woot woot!  Check it out...


To create this card I stamped my flower image twice and colored one with lighter pinks and the second one with darker pinks on the petals.  I then fussy cut them both out and adhered them together.  I then stamped the sentiment and die cut it to look similar to that of a leaf.  I then created my own stem and framed it all in with one of my negative die cut piece.  I added some sequins and twine to finish it off.

I am entering this into the Marker Pop Challenge: Anything Goes - colored with my copics woot woot!

Now if you've stopped here by chance make sure you start at the beginning by going to The Alley Way Stamps Blog for more inspiration, giveaways details and more!
Did I mention Giveaway?

Today's winner will get all THREE new sets!

If you want to be that winner, all you have to do is follow the Rafflecopter instructions found on The Alley Way Stamps Blog! We are releasing an extra set this month!!!!!

You can pick and choose which ones you want to do, but the more you comment, the more chances you have to win!

For our friends that are on not Social Media, you can comment below to win - we will randomly pick from either the Rafflecopter participants or commenters!

This runs today only (JULY 31, 2015), so don't miss out on your chance to win!


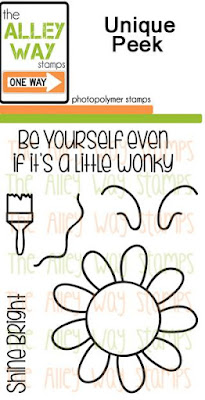
And here is the set I've used today... Unique Peek! Like I said before this is the FREE when you spend $40.00 
or more during the month of August 2015.


So, are you ready to hop and win???!!!

Lisa - You are here
Marina - Go here next
Yuki

Thanks so much for stopping by and Happy Crafting!!!!
Lisa

Thursday, July 30, 2015

Hi - A Little Late

Hello!  I have one more post I wanted to share with you all today, and while it is going up quite a bit later than I anticipated and least it's going up! hehehe!  ( It's been that kind of a day! )  So without delay here is a card I created based on one challenge and one celebration....


The Celebration this card was based on is for Jenn Shurkus's 10 year Blog Celebration, yay!  I'm a super fan of her work, and had a blast looking through her past projects and finding one to CASE.  It was hard to narrow it down, but this one really caught my eye.  I also love how she is kind enough to offer step by step photos on techniques she uses with her projects.  So while I don't have any texture paste to run over my stencil, I used Chalkboard paint instead.  I was inspired by her layout too, so that is where my tag and Sticker sentiment came in.  Make sure you stop by and see how other's have been inspired by her work, thank you Jenn for all of your inspiration, sharing, and teaching!!!

I was also inspired by the Runway Inspired Challenge... this happens to be one of my favorite challenges to play along with, and this inspirational outfit was no different.


And lastly I'm entering this into the Simon Says Stamp: Anything Goes Challenge

Happy Crafting!
Lisa

You're Dog-Gone Awesome

Hello!!!  Today I'm sharing a cute clean and simple card with you on The Butterfly Reflections Ink Blog using a newer stamp set by Avery Elle...


Supplies Used:
Stamp: Furry Friends (Avery Elle)
Die: Small Stitched Rectangle Dies (Lawn Fawn)
Ink: Tuxedo Black (Tsukeniko)
Copics

I hope you will get a chance to check out the full post of this little guy on their blog and have an amazing day!!!!
Happy Crafting!
Lisa

* Please note I am signed up as an affiliate for the Butterfly Reflections Ink Store because I really love the products they carry as well as the amazing customer service, I know you will like them too!

Wednesday, July 29, 2015

Ho, Ho, Ho? Sneak Peek with The Alley Way Stamps

Hello!  Today I am popping in to share a sneak peek at one of The Alley Way Stamps soon to be released stamp set called Every Day's A Holiday.  Now this set is a extended set that works perfectly with the soon to be released Penguin's On Parade, but you could use the images on here to dress up other sets as well.  I just love these two sets together, and almost can't stop giggling when I get to play around!  Here is a peek, that just might give you a giggle too...


haha!  See what I mean?  So funny!!!  Anywho, you are going to want to stop by The Alley Way Stamps Blog today to see more sneak peeks of this set.  While the trees and Santa apparel come from the Ever Day's A Holiday Set, I have also used older sets such as Wreathed in Love (snow dots), Gabfest (question mark), Tag-alongs (sentiment), and the soon to be released Penguins on Parade (Penguin).

I am also entering this into the Simon Says Stamp Challenge: Sparkle & Shine

Now hurry over to see more peeks!!!
Happy Crafting!
Lisa

Monday, July 27, 2015

Star Student

Hello, hello!  I'm popping in today here and on The Alley Way Stamps Blog to share another card I've made to sneak in my little man's lunch box next year.


Once again I went to the Express Yourself Stamp Set to make a fun background that is perfect for a school theme.  This time I chose to mix up the letters and stamp them sparatically in no certain order. After I heat embossed the letters in clear I spritzed the whole watercolor cardstock with water and then dropped in some Magicals pigment powders and spritzed more to let the colors mix.  I then die cut a second panel with various sized stars, and stamped the sentiment (from the same stamp set mind you!) before adhering in with foam adhesive.  I then added faux stitching and adhered it to a black mat.  Added a few star sequins and it's done!

I am entering this into the following challenge:
Simon Says Stamp: Sparkle and Shine Challenge

Thanks so much for stopping by today and Happy Crafting!
Lisa

Parchment Craft Challenge

Hello!  It is time for a new challenge at SweetStamps.com, and this time it is a technique challenge called Parchment Crafting.  If you have never done parchment crafting then it really is a fun, cool and unique way to make embellishments or even a full card.  Here is a video I found helpful.  And now onto my card for this challenge:


Tips: Make sure you use a thick vellum when you are creating your project, and that you have a soft mat on one side.
I would love to see you play along, especially if you've never done this technique yourself.  Challenge yourself to try something new!  You might just like it!  All products are welcome and those using a SweetStamps.com image and or die get a double entry.

Thanks so much and Happy Crafting!
Lisa

Saturday, July 25, 2015

Papertrey July Blog Hop Challenge

Hello!  Today is PTI's Blog Hop Day, yipee!!!  I was able to play along this month with a much older set called Butterfly Kisses... here was our inspiration for the hop...


I was inspired by the colors of the butterflies and the wood background to create this...


I was trying to show the sparkly goodness on this card, but wink of stella is so hard to capture on camera!  Anywho, I hope you can imagine how pretty it is in real life, hehehe!

Thanks so much for stopping by and Happy Hopping!
Happy Crafting!
Lisa

Friday, July 24, 2015

Faber-Castel Guest Designer Post

Hello!  Today is super exciting for me because it is my first day as a Guest Designer on Faber Castell Design Memory Crafts Blog!!!! Eeeeekkk!!!!  I could hardly believe my eyes when I saw my name on the list, and now I'm just tickled pink to see some of my work on their blog!  I would be so honored if you had a moment to stop by my post over there and leave me a little message.  Here is a peek at what you will find, but full directions, photos and supply list will be found on their blog.


Thank you so much and Happy Crafting!
Lisa

Wednesday, July 22, 2015

Sending a Little Sunshine

Hello!!!  Today I am sending you all a little sunshine with this super happy card that I've created using the new Neener Neener Stamp Set from The Alley Way Stamps.  I must also mention that this set is the free with any $40 purchase this month, so double score!  Now let's check out my card...


Now this card came together quite easily and on a whim for me.  I'm going to use one of Virginia Lu's words and label this card a pot luck card.  This means I had random things laying on my desk from past projects and I mixed them all together to create this card!  Love it!  Since the distressed hill and frame were already done I then chose to diecut two yellow circles for dimension on my sun and stamped the face on top.  When I first laid this down and stamped my sentiment from the More Than Words Set I felt it looked bare, that's when I decided to add a background with stencils and distress ink to keep the colors cohesive.  I then added the arrow at the last minute and loved it! :)  Hope this card has brought you a smile today!

I am entering this into the Papertake Weekly Challenge: Build it Up

Happy Crafting!  And make sure you stop by The Alley Way Stamps Blog to check out more inspiration!
Lisa

Tuesday, July 21, 2015

Layout with New DCWV Stack! Yay!!!

Hello!  Today I am here to share a super fun snow layout using a non winter stack, and it's new to boot!  I LOVE me some DCWV Paper Stacks, and these new ones are awesome!  The stack I have used is called Hello Darlin' and it has a fun mix of pinks, greens, and yellows with gold foil!!! Gold foil is so hot right now, and the weight of the paper in this stack is awesome too!  Let me show you the layout before I keep gushing hehehe...


Everything on this layout was trimmed from the Hello Darlin' Stack except for the obvious sequins, and the part of the title "snow lion" which was die cut out of my 6 x 6 Foil Stack.  To start this layout I trimmed my photos and figured out where I wanted to stick them on my layout.  Then I made some pencil marks and using gesso and a piece of plastic to apply the gesso and make the "snow" look behind my photos.  I then cut strips of various cardstocks and laid them in a sunburst pattern behind the photos.  I then die cut snowflakes and title.  I also fussy cut the Hello.  Ta-da!  This layout just makes me so happy!

Other fun news... have you checked out the new DCWV Inc. Website?  It is still getting some work done, but it looks soooo good!  And you can see some newbie products too!


This layout was based on the My Scraps & More Sketches Challenge #109:


Thanks so much for stopping by and Happy Crafting!!!
Lisa

Monday, July 20, 2015

Twinkle, Twinkle... a Baby Card

Hello, hello!  Today I have a sweet baby card to share with you using a few older Alley Way Stamp Sets here and on The Alley Way Stamps Blog...


Stamps: The Alley Way Stamps ( Star of the Show, Out of This World, Got It Covered )

To create this card I stamped and heat embossed my star background before diecutting two sets of waves.  Next I stamped my sentiment and cut it out.  I then stamped and colored my little boat image before I fussy cut it and adhered it between the waves with foam adhesive.  Finally I added some clouds with second and third generational stamping.

I am entering this into the following challenge:
AAA Cards: Waterworld and Dies


Thanks so much for stopping by and Happy Crafting!
Lisa

Snow Canvas with some fun Globecraft and Piccolo Accents

Hello and Happy Monday!  Today there is a new challenge going up on SweetStamps.com's Blog and it's all about Snow! yay!!!  I decided to make a canvas scene for me to hang up in Winter...


Supplies Used:
Enamel and Embossing Powder Adhesive Fluid
Enamel Powder: Mossy Glen, Siam Silver, Turquoise Lagoon, Deep Blue Sky
Fine Detail Embossing Powder: White and Fantasy White
Piccolo 3D Enamel Gel Titanium White
Snow flake Accents

I can't wait to see what you create for this new challenge, remember all products are welcome in our challenges.

Thanks so much for stopping by and Happy Crafting!
Lisa

Friday, July 17, 2015

Life is Good Stencil Card for Nani Ke Ola Blog

Hello!  Today I am sharing a fun, bright and happy card with you here and on the Nani Ke Ola Blog!  This card was easy to create, but has a fab artsy feel to it...


Supplies Used:
All products are by Prima Marketing unless noted otherwise: Butterflies Stencil, Watercolor Brush Pen, Watercolor Pencils - The Basics, Empress Gold Color Bloom Spray
Foil Die Cut: Pink Fresh Studios
Die: Lawn Fawn

To create this card I started with a panel of watercolored cardstock and began tracing the butterfly stencil with a very fine tip PITT artist pen.  Next I went through and haphazardly colored the butterflies in various colors with my Prima Watercolor Pencils.  Once everything was colored I went over them quickly with my Prima Waterbrush letting the colors blend and purposely taking them outside the lines.  Tip: when mixed colors make sure to wipe your waterbrush between shades, this prevent any muddying of the colors.  Once this dried I spritzed it with some Prima Gold Color Spray. My final step was to diecut the panel and adhere it back in place with foam adhesive.  I then added my embellishment/sentiment and ta - da!

I am entering this into the Simon Says Stamp Monday Challenge: Anything Goes


Thanks so much for stopping by and Happy Crafting!
Lisa

Thursday, July 16, 2015

A little MFT Summer School


Hello!  Today I am playing along with the MFT Summer School Lesson #7 Complimentary Colors... these are colors that are across from eachother on the color wheel, for a full details explanation with amazing examples make sure you swing by their blog when you're done here!  I recently got the Watercolored Flowers Stamp set and knew this was the perfect time to play around with them.  While I'm not sure my stamping was perfect I really love the turn out and how fun this set is to play with.  I chose to work with blues and oranges...


Stamps: MFT - Watercolored flowers and LJD Together Forever

I am also entering this into the 7 Kids College Fund Anything Goes Challenge

Thank you so much for stopping by and I hope you have a fabulous day!
Happy Crafting!
Lisa

Wednesday, July 15, 2015

Game On Layout

Hello!  It's the middle of the week, woot woot!  And today I am here and on the Alley Way Stamps Blog sharing this fun layout of my littles playing one of their favorite games, Trouble.  The new Old School Stamp Set was perfect for this...


To create this layout first I played with my papers to figure out my layout design then I started stamping on my background and coloring my game pieces in.  I also used the stamps for a quote sentiment at the bottom ( one of my favorite sentiments in this set, cracks me up everytime! ) and the dice embellishments too.

I was also inspired by the Scrappy Friends Challenge: Tic Tac Toe - I used glitter enamel stars, stripe paper and stamps! And the Scrap Our Stash Challenge: P - Punch ( I used an edge punch ), H- heart, O - Orange Marker, T - Tape ( washi tape ), O - Orange Paper, S - Stripe paper


Thanks so much for stopping by and Happy Crafting!
Lisa


Tuesday, July 14, 2015

Thinking of You with WPlus9

Hello!  I hope you've had a great start to your week so far!  I'm popping in to share a card I created for the newest WPlus9 Sketch Challenge that was created by the amazingly talented Joni Andaya Aptly titled, Get Sketchy with Joni, hehehe!

Here is what I've created:


Supplies Used:
WPlus9 Fresh Cut Florals ( sentiment )
WPlus9 Spring Wreath Die
Ranger WaterColor Cardstock
Patterned Paper: Heidi Swapp
Sequins: Pretty Pink Posh, The Ton, and V's Sweet Ideas
Peerless Watercolors
Heidi Swapp Color Shine

To create this card I started by adding lots of water to my watercolor cardstock and then dropping the watercolor in and letting it run.  Next I spritzed it with silver and navy blue color shine for more depth in color and for some fun splats around the edges.  I then set this to the side to dry.  Next I die cut the wreaths and flowers.  Using my stylus I curved the flowers petals up and glued the little flowers within the larger ones.  When my watercolored panel was dry I trimmed a diagonal cut and adhered patterned paper behind it.  I then stamped my sentiment, adhered the wreath with flowers and added the sequins as a finishing touch.

And here is a look at the sketch:


I am also linking this up to Simon Says Stamp Monday Challenge: Anything Goes
Thanks so much for taking the time to stop by!
Happy Crafting!
Lisa

Monday, July 13, 2015

So Proud of You

Hello!  Today I am sharing a fun Back to School Card that I've created for my son Aiden here and on the Alley Way Stamps Blog... not that I want to send them back already, but when I first saw the new Express Yourself Stamp Set the idea for this card just popped into my mind so I had to get busy before I forgot!


Doesn't this set make a great background?  Plus, look at the fun sentiment I was able to personalize! I LOVE it!  Alphabet sets are great for adding that special touch to cards, and this one has so many letters and such fun fonts.  Anywho, I mixed this set with the older Learning Curve Set for the bus and star images.

I am entering this into the following challenge:
Addicted to Stamps: Make Your Mark
and in the Simon Says Stamp Monday Challenge: Anything Goes

Thanks so much for stopping by and Happy Crafting!
Lisa

Warm Winter Wishes... in July haha!

Oh yeah we are still going Christmas in July on the SweetStamps.com Blog, and this time we are challenging you to use traditional colors on your project.  I chose to watercolor this sweet bird image, and to frame it in at the corners...


Supplies Used:
Versafine Ink
Distress Markers
Watercolor Cardstock

Remember all products are welcome in our challenges, and you will earn a second entry just by using a SweetStamps.com image or die.

I am adding this to the following challenges:

Thanks so much for stopping by and Happy Crafting!
Lisa

Friday, July 10, 2015

Mixed Media with PinkFresh Studios and More!

Hello!  Happy Friday!!!!  Today I am sharing a fun Mixed Media piece I created here and on the Nani Ke Ola Blog!  I was really in the mood to just make something different, and this was exactly what I needed...


To create this project I started by tearing lots of little pieces of paper from the Pink Fresh Up in the Clouds Collection.  Then I started adhering them to my canvas with Modge Podge.  Once all of the pieces were glued down and dry I covered them with White Gesso with my finger.  I then started adding more colors of pinks, white, blues and yellows to the background with Gellatos and rubbing them in, again with my fingers.  To blend in with the golds of this collection I used the Prima Empress Gold Spray and left it to dry.  In the mean time I picked out some wood veneers by Ellie's Studio and Covered those in matching gellato colors.  Next I tore a vellum sheet from the Pretty Little Studio's Christmas Collection and used it to mat my photo.  Finally, I added more texture by going over my 7Dots Squares Mask with Translucent Embossing paste.  I left all of this dry over night and ta-da!!!

I was also inspired by the Sumer Days Challenge at The Mixed Media Monthly Challenge Blog, as I've used bright summer colors and a photo of my children last summer. 


I am also adding this to the Stamplorations July Stencil Challenge.

I just love this fun little piece of art and can't wait to display it in my house.  Thanks so much for stopping by to day and Happy Crafting!
Lisa

Thursday, July 9, 2015

Monochromatic Butterfly Layout for DCWV

Hello beautiful blogging friends!  Today you will find me on the DCWV Blog, I hope you will get a chance to check out a layout I've created using their Birds and Butterflies Project Stack!


View blog post for supplies


Thanks so much for stopping by!
Happy Crafting!
Lisa

Wednesday, July 8, 2015

You Splatter to Me...

and you do!  Today I have a fun and graphic clean and simple card to share with you all here and on The Alley Way Stamps Blog using the new Oh Splat Stamp Set...


To create this card I started by randomly stamping the splat images onto cardstock.  Next I diecut a heart from my stamped images.  The frame was created from the leftover negative cut for an earlier project and it fit perfectly on here.  Finally I stamped my sentiment and popped the heart up for dimension.

I am entering this into the following challenge:
Virginia's View Challenge: 100% Stamping

Thanks so much for visiting me today and Happy Crafting!
Lisa

Tuesday, July 7, 2015

Look Ma, I'm on Youtube! - Altenew Style

Hello!  Today I am sharing my very first ever Youtube project for my personal Youtube page, woo hoo!!!!  When I saw the new Altenew Challenge was a video challenge at first I was a little timid about it... I had done a few ( by few I mean maybe 3 or 4 videos ever ) videos for other blogs, but I had never done one just for myself, or for my personal Youtube channel... but then I remembered I had been wanting to start doing my own videos so why not take the challenge and start now?  So here I am...


Supplies Used:
Stamps: Altenew (Floral Motifs and Sentiments & Quotes)
Ink: Versamark and Versafine by Tsukineko
Embossing Powder: Fine Detail Fantasy Gold by SweetStamps.com
Watercolor Cardstock: Ranger
Distress Markers: Mustard Seed, Barn Door and Fired Brick (I think I called this Mahogany in the video, sorry!)
Sequins: Pretty Pink Posh

I am also linking this up to the Virginia's View Challenge which is all about stamping!  I love these challenges, stop by to see lots of amazing projects! And with the Marker Pop: Anything Goes Challenge, lots of great colored projects to see!

If you liked my first video I would love for you to subscribe so you never miss any of my future videos!

Thank you so much for stopping by and Happy Crafting!
Lisa

Monday, July 6, 2015

Game On...

Happy Monday!  For all of my American friends I hope you had a nice 4th of July, and to all of my international friends I hope you had a nice weekend!  Today I am sharing a card here and on The Alley Way Stamps Blog using the new Old School Stamp Set... it is super simple but it reminds me of  playing late night dominos with my hubby...  (yeah, we are cool like that)


This card doesn't need much explanation as it was a simple stamping, fussy cutting and a heat embossed sentiment, but I bet it makes you want to busy out your dominos and play, hehehe!

I am adding this to the following challenge:
Happy Little Stampers - Clean and Simple

Happy Crafting!
Lisa

Christmas Tag in July Challenge

Hello!  I am back to posting for the SweetStamps.com Challenges, and this week we are challenging you to create a Christmas tag.  During the month of July it is often fun to beat the heat by thinking about the other extreme, and this challenge did just that for me...


This tag is a fun combination of foiling, die cutting, and glitter glue.  To start I die cut this scene from cardstock that already had double sided adhesive on the one side of it.  After I ran it through several times ( tip: I also used a shim to make sure the small pieces were easy to remove ), I began removing all of the small pieces.  I then removed the other side of the double adhesive and laid my gold foil over top making sure to rub over every part of the die.  Once it was all covered in foil I diecut another circle in white and adhered the two together.  I finally went over the "snow" areas with stickles.  I then punched a hole at top to tie my ribbon and twine too.  The computer doesn't capture it very well, but the foil on here is gorgeous!!!

Thanks so much for stopping by and I hope you will join us in our challenge!
Happy Crafting!
Lisa

Supplies Used:
Winter Village Scene Sweet Cut
Deco Foil Rose Gold
Super Sticky Tape Sheets
Stickles Glitter Glue


Friday, July 3, 2015

Two Stencils, One Background, Say What?!

Hello!  It's Friday, woot woot!!!  And we have a lovely weekend planned with the family to celebrate 4th of July so I am ready for this weekend to begin!  First though, I'm going to share a card today that you can also find on the SweetStamps.com Blog using two stencils to make one background, check it out...


This card was created using two stencil at one time to create this fun and lovely background.  How'd I do that?  Well I started by layering my stencils on top of each other and my cardstock.  My Kitchen Floor stencil went over the paper and then layered it with the Abstract Stencil on the top.  To hold them all in place I used wash tape around the edges.  I then began tracing over the top stencil (Abstract stencil) with my colored pencils in various colors.  Once I had colored the whole thing I removed the top stencil and colored in the open areas of the second stencil (Kitchen Floor) all with a grey colored pencil.  When this was finished I removed that stencil and finished my card by die cutting my butterfly and adhering it back in, adding pearls, and my sentiment embossed on vellum.  Hopefully that wasn't too confusing, because the technique really is a cool one.

Thanks so much for stopping by and I hope you have an amazing weekend!
Happy Crafting!
Lisa

Thursday, July 2, 2015

Guesting with Butterfly Reflections Ink

Hello!  Today I have the pleasure of guesting with Butterfly Reflections Ink, yayness!!!!  It is so exciting because the lovely Vanessa has so many amazing and wonderful new products in her store that you MUST check out...


You know this peek has you dying to see more!  So make sure you stop by the Butterfly Reflections Ink Blog for all the yummy details on the products I have used!


To create this card I started by stamping my little critters, coloring them in and fussy cutting them out.  Next I created my shaker element with distress inks, Lawn Fawn Dies, stamping and sequins.

I am also linking this up to the Virginia's View Challenge: 100% Stamping
and in the Marker Pop Anything Goes Challenge

And just for fun I'm going to share some of my favorite products in her store at this time:

This wooden stamp set

This Lace Background Stamp Set

She has the Clean Color Real Brush Markers as Inviduals!

 Botanical Love Set (sigh)

Summer Sun 6 x 6 Pad

Just to name a few!
Happy Crafting/Shopping!
Lisa

PS - I am part of the affiliate referral for Butterfly Reflections Ink, but all oppinions are my own, and I absolutely love shopping there myself and love their incredible deals as well as customer service.

Wednesday, July 1, 2015

V's Sweet Ideas July Challenge

Hello!!!!  It's a new month ( holy smokes! ) and that means there is a new challenge starting at V's Sweet Ideas, woot woot!  This month we are partying it up with the theme of celebrations... quite fitting since the 4th of July is just around the corner.  Here is what I've created for this new challenge:


To create this card I used the V's Sweet Ideas Birthday Wishes Stamp Set to stamp all of the balloon images and sentiment.  Once I was done I began coloring the balloons with various Copic Markers.  I made sure to use two colors in the spots where balloons overlapped.  I then went through and added all of my strings with a pen before coloring the background with my B000 Copic Sketch Marker.  To finish the card off I die cut the stitches on the sides with the Lawn Fawn Stitched Borders, added some moonshine sequins and matted it to black cardstock.

I am also linking this up to the Simon Says Stamp: Anything Goes Challenge

Hope you will have a chance to play along too! Happy Crafting!
Lisa
 
BLOGGER TEMPLATE BY DESIGNER BLOGS