Showing posts with label distress inks. Show all posts

Friday, May 10, 2019

Just a Note...

to say I'm over on the Crafty Doodle Chick Blog today! Yay!!!  I've gone bright, bold and fun with my project and I'm hoping you can stop by to check it out!


Happy Crafting!
Lisa

Friday, July 27, 2018

When In Paris...

Hi friends!  I'm up on the Crafty Doodle Chick Blog this morning sharing a water color piece with a new Penny Black stamp set, hope you can stop by and check it out!


Supplies Used:


Hope to see you over there!
Happy Crafting!
Lisa

Thursday, March 16, 2017

Caffeine: Sanity in a Cup

Hi!  It is time for a reminder to join us in the STAMPlorations CAS Challenge this month, using the optional twist of sky blue...

Supplies Used: Plaid Maker ARTplorations Stencil, Stamplorations Coffee Happy, CUTplorations Luggage Tags Nesting Dies

Remember all products are welcome in the challenges, so I hope you will play along!
Happy Crafting!
Lisa

Saturday, March 4, 2017

I Miss You... With CAS-ual Fridays

Hi!  Today I am up on the CAS-ual Fridays Blog sharing a sweet and clean miss you card using the newer Special Delivery Stamp Set...


To create this card I started by masking off an area on my white cardstock.  I used long sticky notes on each side.  I then stamped and embossed the envelopes with clear embossing powder.  Before removing the masking I went over the envelopes with distress ink.  I then stamped another envelope onto white cardstock , colored the heart in and cut it out before adding stickles.  I added it to my panel with foam adhesive and stamped my sentiment in the lower right corner.  I LOVE the sentiments in this set, and more than that I love all of the little hearts found in the letters!

If you just have to have this set for yourself ( and I so think you do ) I have a code you can use to save 15% off your total...

Thanks for stopping by and Happy Crafting!
Lisa

Saturday, February 25, 2017

Winnie and Walter: Off the Page and Blending

Hello!  I'm back for day 2 sharing love for Winnie and Walter Products by playing along in their Birthday Challenges!  Today's card was based on two of the challenges: Winnie and Walter: Off the Page Challenge and the Blending Challenge.


 To create this card I originally has a masked heart on my panel and I began to cover the panel with Distress Ink in Mermaid Lagoon, Picked Raspberry, and Seedless Preserves.  While I was doing this a part of my heart lifted and some of my ink was sorely sticking out where my masked heart should have been.  I love the colors I had already blended and I didn't want to ditch the whole thing so I decided to cut out my masked heart and layer my panel to a cardbase instead.  As you can see my heart goes off the page hehehe.  I then stamped, colored, and die cut my little love birds from the So Tweet Set and added a sentiment inside the heart from The Big, The Bold, and The Happy set.  I finished the whole card off with enamel dots in similar blended colors.

I am also linking this up to the Simon Says Stamp: Anything Goes Challenge

Thanks so much for stopping by today, and I hope to see you later on when I share my next card for the challenge!
Happy Crafting!
Lisa

Wednesday, January 25, 2017

For You...

Hi!  I am up on the MarkerPOP Blog today sharing a card I've created with a mix of old and new products together, take a peek...


I hope I will see you over there!  And don't forget all of the new product can be found to order or preorder now in their store! yay!!!

Happy Crafting!
Lisa

Wednesday, November 9, 2016

A Snowy One Layer With Mint Owl Studio

Hiya!  Happy Wednesday!!!  Today you can find me here and on the Mint Studio Owl Blog sharing a sweet one layer snow scene...


Full details on how this card came together can be found on their blog.  And if you stop by leave me a little hello if you can, I love seeing my followers over there too!

Happy Crafting!
Lisa

Thursday, October 20, 2016

Happy Thanksgiving - MarkerPOP Blog

Hello!  Today I am over on the MarkerPOP Blog sharing a super cute Thanksgiving card made with the newly released Pretty Pink Posh Set: "Giving Thanks"...


Hope to see you stop by and see how this card came together!  While you are there why don't you pick up a few of the new goodies in the shop too!!!

Happy Crafting!
Lisa

Wednesday, October 19, 2016

And a Happy New Year!

*This is post #2 for me today, please scroll down if you are looking for my CAS-ual Friday Post! Thank you!!!

Hello!!!  Today I'm sharing a pretty little Christmas card with you that uses the Cardinal Greetings Stamp Set by Mint Owl Studios.  Their new sets are a mix of snarky, sweet, and classic and I'm totally loving them...


To create this card I started by stamping the bough image all the way around a panel in various green inks.  I then went over the panel with Tumbled Glass Distress Ink and die cut the bottom edge.  Next I die cut a star and stamped my sentiment in the center of it.  I finished it all off with some blue sequins.

This card was super easy and could be used for mass production purposes.  Feel free to share with us what you are creating with your Mint Owl Studio Goodies on any of our social media sights, or by tagging us on your own sites!


Happy Crafting!

Lisa

CAS-ual Fridays Final Release Day: Powerful Words

Here it is the final day of new releases for CAS-ual Fridays, and it has been awesome if I do say so myself hehehe!  Today we are sharing the Powerful Words Stamp set with all of you...  I decided to create something a little bit different to show how versatile these sets can be as well.  Since I've had Christmas on the brain lately, that's exactly what I went with...


To create this card I started by inking up one of my acrylic blocks with green and red ink, spritzing this with water and "smooshing" it onto the cardstock.  Once this was dry I stamped and embossed the sentiment in 24 K Gold Embossing Powder.  I then hand drew a frame around it and finished it off with some splattering of gold spray.

Thanks so much for stopping by today and don't forget to head over to the CAS-ual Fridays Blog for more inspiration and then to the store to grab this set for yourself!  Plus I have a discount code you won't want to miss using...


Happy Crafting/Shopping!
Lisa

Thursday, October 6, 2016

Happy... Watercoloring with a Stencil

Hello friends!  Today I have a card I have created for the STAMPlorations CAS Challenge: with a twist of Black this month...


                            ( Crazy Double Running Stitch RectangleHappy Word DieLeaf Prints Stencil)

To create this card I started by adding black soot distress ink onto a panel of cardstock, making sure to always start on the same end and work my way up with the ink.  I then die cut the panel to adhere onto my cardbase.  Next I used the Leaf Prints stencil, distress markers, and water to watercolor the leaf images onto watercolor paper.  I love the results and I was able to mix and match colors on each image, score!  Finally, I ran the happy die through my cutter in black and used a white chalk marker along the edges of the letters to help the word pop off of the black background.  The colorful sequins were the perfect finish.

I am also linking this up to the Kat Scrappiness WCMD Challenge: Make a Card

I can't wait to see what you will create for this months challenge!  Remember all products are welcome, and you can find complete rules on how the challenge works over on the blog!

Happy Crafting!
Lisa

Wednesday, September 14, 2016

Mint Owl Studio September Reveal...

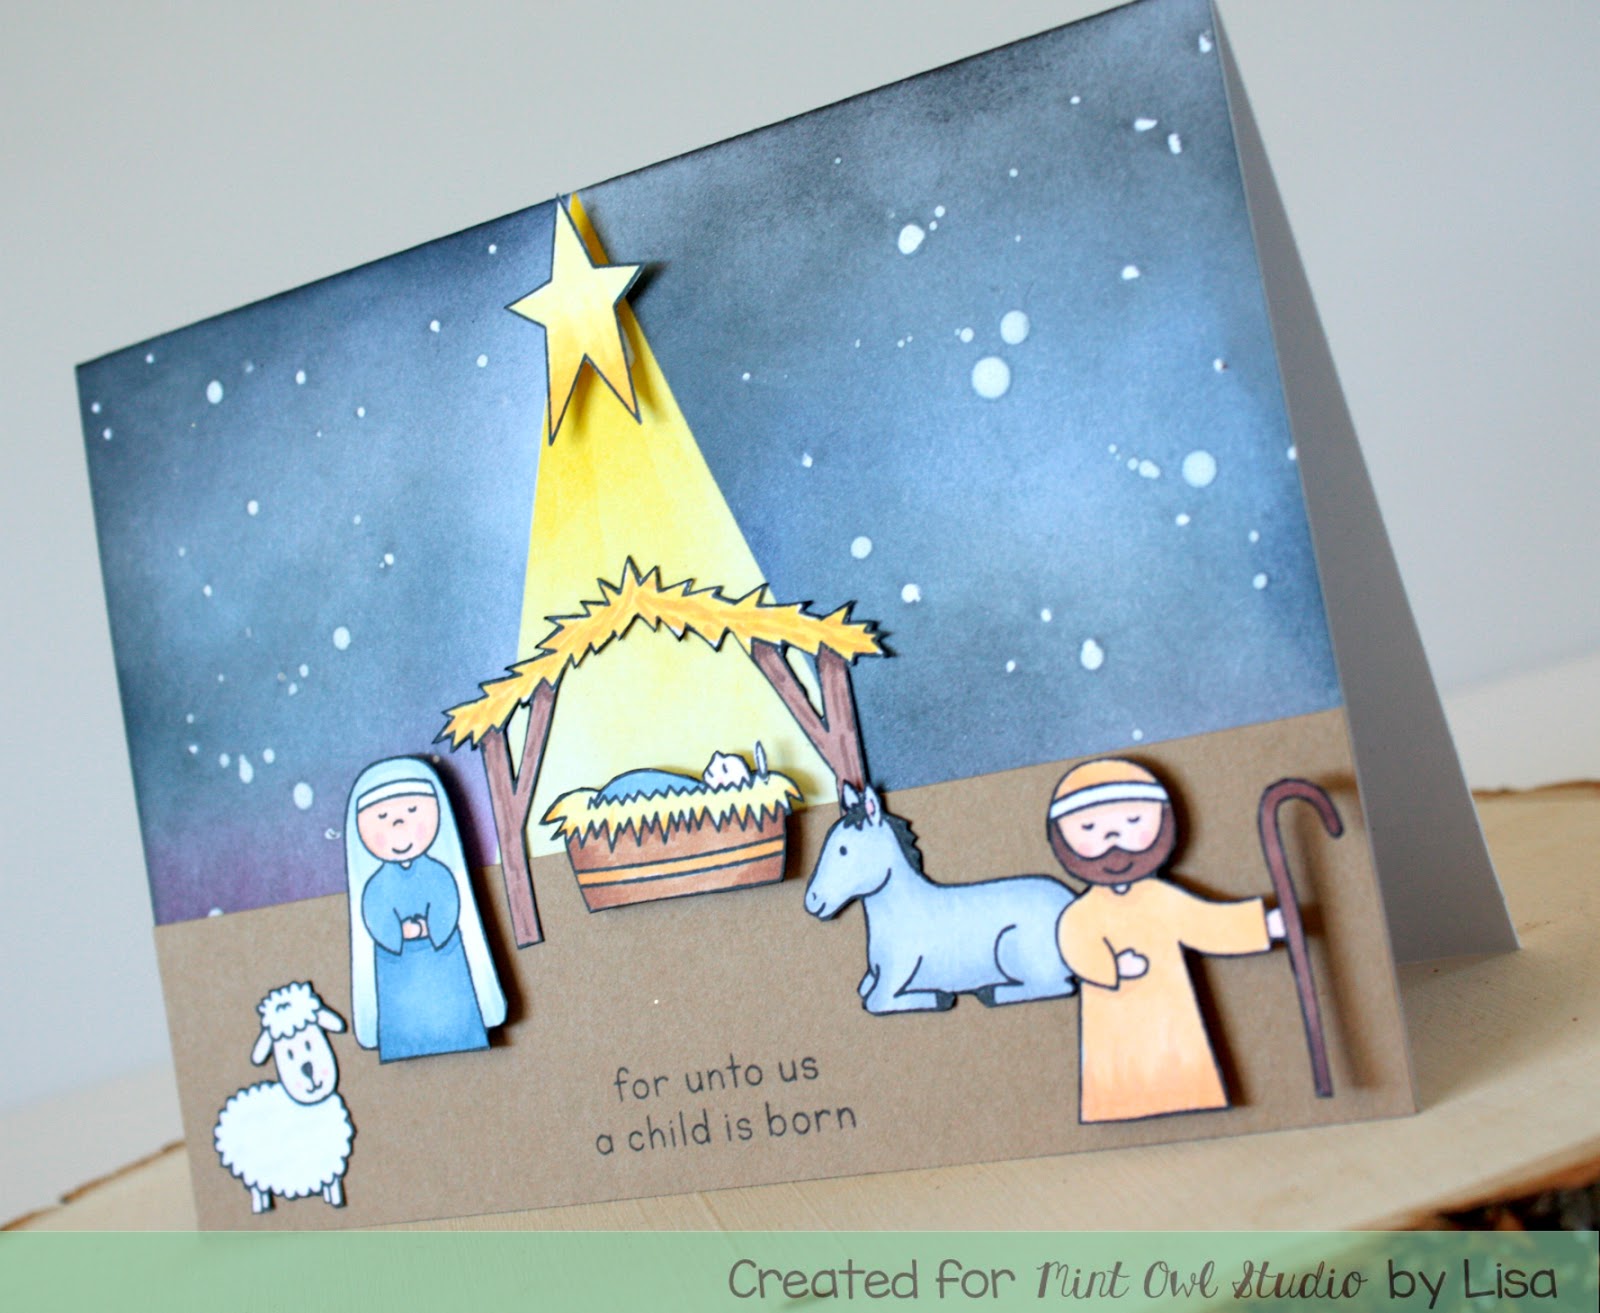
Oh how I love this new and super cute set by Mint Owl Studio that will be available for you to purchase this weekend.  I had so much fun creating this sweet Christmas scene for todays stamp reveal of the new Away in a Manger Stamp Set...


To create this card I started by masking off my background and using various distress inks to create the shine for the star and the night scene around it.  I also did a mix of Masking fluid and white color misting for the white stars in the background.  I then stamped all of my characters and colored them in with various Copic Markers.  After I cut everything out I added them to my "sand" adhering the people with foam adhesive for dimension and the rest of Tombow Mono-liquid Glue.

And doesn't that sentiment just make you think of Charlie Brown?  I Just love when Linus stands on the stage and explains what Christmas is really about, it melts my heart every time.  So I am linking this up to the Simon Says Stamp Monday Challenge: At the Movies

Make sure you pop over to their blog to see the full reveal of this stamp set!

Thanks so much for stopping by and Happy Crafting!
Lisa

Thursday, August 4, 2016

August STAMPlorations CAS Challenge

It is a new month and a new Clean and Simple Challenge has begun over on the STAMPlorations Blog! yay!!!  This time we have the optional twist of using the color gold... yummy!  I love adding gold to everything crafty now days, so this was a fun twist...


To create this card I started by going over my stencil with distress inks, next I ran this panel through my die cut machine with the crazy double running stitch die and embossed the first two words of my sentiment in black.  I then die cut the awesome out of DCWV glitter card stock and popped it up with some foam adhesive.  I paneled it with some gold shimmer card stock and adhered it to my card base.

Can not wait to see what you create for this months challenge, all products are welcome!

Happy Crafting!
Lisa

Wednesday, June 29, 2016

You, Me, & the Sea...

Hiya!  I'm here today and on the Mint Owl Studio Blog sharing this sweet little distressed card using the new Beach Babes Stamp Set...


To create this card I started by masking off a ripped strip of post it note to separate my sky from my sea... I then used distress inks in the following colors: Antique Linen, Victorian Velvet, Seedless Preserves, Chipped Sapphire, and Black Soot for the sky.  I then removed the masking and used distress inks in Tumbled Glass, Broken China, and Salty Ocean.  The little boats were stamped and colored on separate card stock before being trimmed and popped up with foam adhesive.  The sentiment is from the same stamp set and was stamped with Versafine in Onyx Black.  Finally, I finished it all off with some "gold stars" using a gold gel pen.

I am linking this up to the Simon Says Stamp: Anything Goes Challenge
and in Virginia's View Challenge: All About Colors

Thanks so much for stopping by and Happy Crafting!!!
Lisa

Friday, June 24, 2016

Forget Your Mistakes...

Hello and Happy Friday!!!! Woo hoo!!!!  It has been another busy week in our household as baseball is still going on, it's tournament time.  But that's ok, I know one day I will have quiet days when school starts again.  Any who, today I am sharing two more cards for a few challenges.  This first one is a rainbow delight based on the Pretty Pink Posh Rainbow Challenge and the MFT Create Camp Delightful Die cutting...


To create this card I used Yana's card from the Pretty Pink Posh Challenge for my inspiration and then I used the MFT edger dies with some distress ink in the colors of the rainbow.  I then used the Whimsical Wishes Stamp set to stamp on some vellum that I turned into a shaker card with some Pretty Pink Posh Clear Sequins in various sizes and the MFT Mini Scallop Oval Die-namics.

I am also going to link this up to the Simon Says Stamp: Wed. Challenge Add some Shimmer

Happy Crafting and thank you for stopping by!
Lisa


Thursday, June 16, 2016

STAMPlorations Mid Month Reminder

Hello!  Today you will find lots of inspiration for the STAMPlorations June C(lean)A(nd)S(simple) Challenge.  Every month there is a new CAS Challenge on the STAMPlorations Blog  with Anything Goes and an optional color twist.  This month the twist was blue, and here is what I've created...


To create this card I started with a negative cut I already had in my scrap pile, which was a piece of white card stock with a circle cut out of the middle.  I then used the Just Squares Stencil and Distress Ink in Broken China and Tumbled Glass.  Next I stamped the stem from the Blooming Buds set onto the card base.  The leaves and flower images were stamped onto Neenah White Card Stock, colored with Copic® Markers (YG17, YG25, RV14, RV25, RV69), and trimmed out.  I did go over the edges with my black Memento Marker too.  Next I adhered the negative cut over the stem image on the cardbase.  The sentiment was stamped with a matching blue ink on the bottom right corner.  I then popped up my flower and image with foam adhesive, and added the leaves with Tombow Mono Glue.  I then finished it all off with Wink of Stella in Clear.

Thanks so much for stopping by and Happy Crafting!
Lisa

*I am an affiliate for some of these items listed.  This means should you make a purchase through one of these links I am able to make a small commission at no extra cost to you! Thank you for your support!
Supplies Used:
STAMPlorations: Fond Expressions 2, Blooming Buds, Just Squares Stencil
Classic Crest Neenah White Card Stock

View blog post for supplies

Thursday, April 7, 2016

STAMPlorations: CAS Challenge

Hello!  It is a new beautiful month so that means a new Clean and Simple Challenge on the STAMPlorations blog and this time we have thrown in a twist with the color green...


Supplies Used:
STAMPlorations: Blooming Buds, Happy Sunflower, Leaf Prints Artplorations Stencil
Distress Inks: Peeled Paint and Crushed Olive
Copic Markers
Versafine: Onyx Black and Memento: Tuxedo Black

I started by masking off an area of my stencil and went over it with my Distress inks.  I then stamped my sentiment and layered it on a panel of kraft.  Next I stamped my Sunflower and colored it in with various Copics.  Once I was finished I trimmed it out, went over the outlines with a black marker and added some sparkle with my Wink of Stella.... but it needed more hehehe!  So I added some glossy accents!  When it was shiny as could be and nice and dry I popped it up in the corner with some foam adhesive.

I am entering this into the CASology Challenge: Sprout and in the Marker Pop Challenge: Spring

Happy Crafting and thank you for stopping by!
Lisa

Monday, October 5, 2015

Fangtastic Halloween

Hello, hello!  I'm popping in with a fun Halloween card that I've created for the new Anything Goes Challenge at SweetStamps.com, using the cute new Halloween Kids Clear Stamp Set...


Isn't he so fun?!  And he was so fun to color in too!  I started by stamping him onto my white cardstock and colored him in with Copics.  I then masked him and added the negative diecut of an oval and went over it with Distress inks.  I stamped the sentiments last before layering it with various panels of patterned papers.

I am linking this up to the Virginia's View Challenge: All Things Colored
and the Simon Says Stamp WCMD Link Up

Thanks so much for stopping by and Happy Crafting!
Lisa

Supplies:
Halloween Kids Clear Stamp Set
Copics
Distress Inks: Seedless Preserves and Dusty Concord

Wednesday, September 9, 2015

Hip-Hip-Hooray!!!!

It's Wednesday, yay!!!!  Today I am here and on the Alley Way Stamps Blog sharing this colorful and almost one layer card.  If I hadn't done my card on a panel of watercolor cardstock this card would have been one layer, as nothing else is separate, but technicalities say it's different, booo! hehehe!  Anywho, I hope this bright little guy brings you a smile...


To create this card I started by stamping the little turtle from the It's My Party Stamp Set first and masking him off.  Next I used a stencil and various distress inks to create my fun background.  I then added a few water droplets for more interest.  Once this dried I removed my mask and colored this little guy in with Copics.  Finally I stamped my sentiments and adhered the whole panel to my cardbase.

I am adding this to the Simon Says Stamp Make It Colorful Challenge
and in the Time Out Challenge: Make Your Mark

Happy Crafting!
Lisa

Wednesday, August 26, 2015

Be Original!

Hello and Happy Wednesday!  I'm popping in to share a card that you will also find up on The Alley Way Stamps Blog today.  I have used the super cute Penguin's On Parade Set, it has quickly turned into my favorite TAWS set, as I'm sure you've seen how much fun us DT girls have had getting crafty with it hehehe!  Here is my sweet card...


Come on, it's a chubby adorable bee!!!! I LOVE it!!!! To create this card I started by stamping my little guy in his bee custom on separate cardstock, colored him with Copics and my Faber Castell Design Memory Craft Brush Black PITT Pen.  Then I fussy cut this little guy out. ( PS - for you lucky ladies who have a cutting machine did you know that Alison also makes the SVG's available for her stamps? Score!)  I then used the negative of a die cut and blended some Distress inks together and then flicked some silver spray mist over it.  I then stamped my sentiment above the left side of my heart.  I popped my little guy up with foam adhesive and added some black enamel dots.  Finally I adhered it all to some Dear Lizzy Patterned Paper.

I am entering this into the following challenges:
AAA Cards: Maskerade Challenge 
4 Kids Challenge: Anything Goes
Marker Pop Challenge: Anything Goes with Markers

Thanks so much for stopping by and I hope this little guy has spread some smiles!
Happy Crafting!
Lisa
 
BLOGGER TEMPLATE BY DESIGNER BLOGS