Sunday, July 30, 2017

Aloha Challenge #126 with MarkerPOP

Hello!  It is time for a new challenge over on the MarkerPOP Blog.  I tell you these challenges go so fast for me, even though you have two weeks to play with our challenges I still think it flies by hehehe!  Any who, today has another fun photo inspiration that fits perfectly with this time of summer I think...


To join our challenge all you have to do is use some form of a marker that is offered in the MarkerPOP Store, which trust me there are a lot of marker choices!  And here is what I've created based on the inspiration...


To create this card I've used the Sugar Pea Designs Pineapple Paradise Stamp Set, Memento Ink, Versafine Ink, and my Spectrum Noir Illustrator Markers.  I hope to see your creations linked up!  Remember there are great prizes offered every time just for playing along!

Happy Crafting!
Lisa

Wednesday, July 26, 2017

Dancing Animals with MarkerPOP

Hello!  Today I am up on the MarkerPOP Blog to share a fun little party card, and I hope you'll get to stop by and see all of it by hopping over there!


Thanks so much and Happy Crafting!
Lisa

Saturday, July 22, 2017

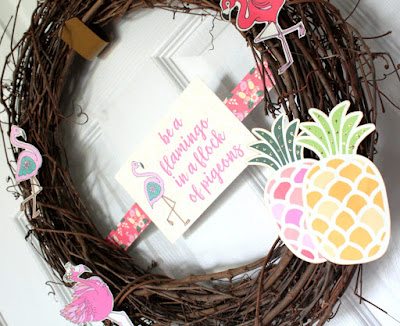
AdornIt Wreath - Be A Flamingo

Happy Saturday!  I have a bright and cheerful wreath I've created this past week with some fun AdornIt Patterned Paper...


Hehehe!  Don't you want a group of flamingos on your front door?!  I just love the cute sentiments in the Flamingo Fever Paper Collection and had to use one in the center of my wreath.  I then used scissors to fussy cut my pineapples and flamingos.


Thanks so much for stopping by today and Happy Crafting!
Lisa

Friday, July 21, 2017

Make A Wish! On MarkerPOP!

Hi! I'm popping in one more time today to share a peek at a card you will find on the Marker POP Blog!  Head over for full details and pictures!


Also, make sure you enter their amazing giveaway going on with 3 prize winners to be had!
Happy Crafting!
Lisa

A Muse Studio Release Day!!!

Hello again and hooray!!!!  It's finally release day over at A Muse Studio!!!  Here are the projects I've shared this week with the new goodies, and I've added one more to entice you with this great release...


Happy Shopping and then Crafting!
Lisa

Thursday, July 20, 2017

Friend Friday with CAS-ual Fridays Stamps and Chameleon


Hello!  Today is a very fun day as the CAS-ual Friday team is joining us with the Chameleon team for inspiration and prizes!  Make sure you hop over to the CAS-ual Friday Blog for more information!  Here's a sneak peek to send you on your way...


Happy Hopping!
Lisa

A Muse Studio Sneak Peek Day #3

We've made it to Day 3 woot woot!!!  That just means one more sleep until you can add these babies to your cart, Yay!!!!  Today I'm sharing the freebie stamp set that you can earn for free with any $35 purchase, who doesn't love free?!  ( I know lots of ! marks, but I can't help it, I'm just so excited! )

Check it out...


Aren't these little ice creams so cute?!  Plus the sentiments that go with it are super fun!  Plus there is a matching die set, so double score!


Supplies Used:
Cardstock: Orange, Buttercup, Sky Grass, Blush, Radient White
Stamps: You're Cool and Mad for Plaids
Organdy Ribbon in Sky

Now make sure you hop over to the A Muse Studio Blog for a chance to win this set before it's even available!  And remember the You're Cool Stamp Set will be yours free with any $35 purchase!

Happy Crafting!
Lisa

Wednesday, July 19, 2017

A Muse Studio Sneak Peek Day #2

Hello!  I hope you enjoyed the first day of Sneak Peeks with A Muse Studio!  Now I'm back with a peek of the Bouquet Builder Stamp Set and matching dies...


This stamp set has a beautiful array of floral images including the beautiful flower I've used on this card.  I also love how easy the matching dies make it to create your own floral arrangements with dimension and depth.
Full supply list:
Cardstock: Sky, Radiant White, Gingham Grass
Stamps: Bouquet Builder, Thanks So Much
Dies: Bouquet Builder, Scallop Border Medium
Ink: Sky, Buttercup, Memento, Versafine
Doily
Sequins: Grass
Foam Adhesive
Polka Dot Organdy Sheer Ribbon: Fern

Make sure you hop over to the A Muse Studio Blog to leave a comment for your chance to win this new set, and for more inspiration!
Happy Crafting!
Lisa

Dancing On the MarkerPOP Blog + Giveaway Details

Today I'm up on the MarkerPOP Blog sharing this cute little party animal from the new Winnie and Walter Happy Dance Set and new Concord and 9th Sunshine Turnabout...


Don't forget if you stop by to leave a comment to be entered to win a $10 gc! woot woot!  And join in our challenges for an awesome prize box (I'm pretty jealous!).  That's not all!  There is also a Creative Giveaway you don't want to miss!

Happy Crafting!
Lisa

Tuesday, July 18, 2017

CAS-ual Fridays Makes Me Smile!

Hello, hello!  I'm here today with a card that you can also find on the CAS-ual Friday's Blog, yay!!!  I love to mix and match products from one company, and today I've done just that!


 To create this card I started by creating my shaker element out of the Tag Buddies Fri-Die Set.  I die cut the Smiling Fri-Dies Set three times to give it added dimension on the front of my shaker.  I then added it all onto cut patterned paper.  Finally, I stamped my fun sentiment from the Sassy Smiles Stamp Set and ta-da!

Thanks so much for stopping by and don't forget there are a few more retiring stamps available for $7.77!  And you can use my code to save another 15% off your order!!!


Happy Crafting/Shopping!
Lisa

A Muse Studio Sneak Peek Day #1

Hello my wonderful friends!  I'm so excited to share the first day of the A Muse Studio sneak peeks with you today!  There are some gorgeous floral images in this release, and if you are anything like me you are going to NEED these in your stash!  First up I'm sharing a project I've created with the Southern Bouquet Stamp Set...


To create this card I started by first stamping my bunch of florals off to one edge of my Vanilla cardstock panel. I then colored the flowers in with my A Muse Studio Pigment inks in: Orange, Sky, and Fern and a blender stick.  Next, I die cut the opening for my sentiment to go over with the Stitched Circle Windows Die.  I added some Orange Cardstock behind the opening for an added pop of color.  I then stamped and embossed the sentiment, also from the Southern Bouquet Stamp Set, in White Embossing Powder.

I then layered it all on a panel of Fern Cardstock, and added some blue pearls to finish it off...


Make sure you hop over to the A Muse Studio Blog for more inspiration, peeks and a chance to win one of the new sets for yourself!

Happy Crafting!
Lisa

Sunday, July 16, 2017

MarkerPOP Challenge #125

Hello!  I hope you are having a nice weekend!  So far the weather has been gorgeous here in Ohio.  I'm popping untidy to share the new challenge happening on the MarkerPOP Blog.  These challenges are always fun and easy to join along as all you have to do is use some type of marker that is carried in their store!  Super simple!  Plus you can win awesome prizes!  Any who, here is the newest inspirational photo and what I've created based on it...


I instantly thought of going to a fair of some type and busted out my Mama Elephant Little Dog Agenda Stamp Set to create my own fair like scene...


To color in my scene I used a mix of Distress Markers, water, and a brush.   I had used a Copic drawing pen to create my little tight rope, but in hindsight I should have added it after I watercolored. duh!


I also used the new Winnie and Walter Stamp Set: Sentimental Birthday for my sentiment.  Thanks so much for stopping by today and I can't wait to see what you'll create for this challenge!
Happy Crafting!
Lisa

Tuesday, July 11, 2017

Crafters Companion on HSN NOW!!!

EEEKKK!!!  Today is the day!!!  I'm so excited and will be helplessly glued to my tv as Crafters Companion will be on HSN off and on all of today!  Starting with 1 am this morning, continuing on to 3 am, 8 am, 5 pm, 8 pm EST.  Here's a sampling of projects I've made that you just might see on TV!  And join in the FB fun here, for inspiration, talk, and giveaways!


Can you tell I'm excited?! hehehe!  See you over in the FB group!
Lisa

Friday, July 7, 2017

ADORNit! Take 3

And I'm back!  I have one last card to share that I've used the ADORNit! Hello Friend Mini Coloring Book, The Ton Stamps: Sending Peonies Stamp Set, and my Spectrum Noir Colorblend Pencils...


Out of the three cards I've shared today, I have to say that this one is my favorite.  I think it is because of the brighter and more tropical colors that I've used, and I really love the touch of yellow on the leaves.  For added dimension I went over some areas with a black gel pen, a white gel pen, and a gold.  I will definitely be keeping this color combo in mind for future floral projects!

I am also entering this card into the Simon Says Stamp Summer Sunshine Challenge 

Thanks so much for stopping by and seeing my creations today!  Here is a final look at all three of the cards I've shared here on my blog and I hope I've inspired you to get those mini coloring books out and make your own clean and simple card designs!

Happy Crafting!
Lisa

ADORNit! Mini Take #2

Hello, hello!  I'm back on this beautiful Friday to share my second card using the mix of the ADORNit Mini Coloring Book: Hello Friend, Spectrum Noir Colorblend Pencils, and The Ton Stamps.


 Did I mention how much I love how well my Gamsol works on this paper.  I would assume it's because of the paper being watercolor, so it helps the color to blend and holds the Gamsol better than regular cardstock would.
I also added some fun shine on this card by going over it with my Spectrum Noir Crystal Clear Sparkle Pen.  I LOVE the shine it adds in real life.

Thanks again for stopping by and I hope you'll join me one last time today to see a final card created with these 3 products.

Happy Crafting!
Lisa

ADORNit! + Spectrum Noir = Color Happiness!

Hi!  Today I will be popping in several times sharing some cards that I've created with my ADORNit Mini Coloring Book and my Spectrum Noir ColorBlend Pencils.  These two work perfectly together, and here is my first card that easily came together...


 To create this card I chose a page out of the Hello Friend Mini Coloring Book by ADORNit!.  I then colored it in with my Spectrum Noir Colorblend Pencils.  Next, I used a stamp set called Sending Peonies by The Ton to add my sentiments.  As I wanted the coloring to be the main focus of my card I used a simple silver foiled cardstock to mat it before adhering it to a cardbase.

I added a few sequins to finish it off!  Thanks so much for popping in and I'll be back with a few more quick and easy ADORNit! based cards :).

Happy Crafting!
Lisa

Thursday, July 6, 2017

Crafter's Companion, July 11th, HSN EEEKKK!!!!

I'm so excited and I just can't hide it!!!  We are getting closer and closer to the Crafters Companion Release and Fun on HSN July 11th!!!  Make sure you set your alarm clocks, dvr's, and get ready for a day full of inspiration!  Today I'm popping in to share one of the projects I've created with some of the products that will be available that day.


 To create this gift box I used several of the 6 x 6 Embossing Folders that will be available onto two different mediums.  The box was embossed and created out of Crafters Companion Construction Cardstock.  (If you like to create 3D items then this cardstock is a must! So Sturdy!)  The Folders I've used are part of the Embossalicious Embossing Folders and are called Flora Bunda and Regency Swirls.  These folders give nice deep impressions everytime, and they are great for all kinds of mediums.

My butterfly for example was die cut and embossed out of an old Milk Jug!  LOVE when you can upcycle and make something so pretty!  To create the butterfly I die cut it from the Die'sire Graceful Butterflies Die Set twice from plastic I had cut off of an old Milk Jug.  I then ran both of them through my Gemini with the Regency Swirls Embossing Folder.  Next, I painted over the butterfly with acrylic paint in purple and set them to dry.  I then lightly went over the images with a pearl paint and my finger to help accentuate the embossed areas.  Finally, I adhered them together in the middle and added some beads with beads to act as the antennas and body of my butterfly.

It's so fun to create your own embellishments so that you can really personalize them for your recipient.  Thanks so much for checking out my little creation today and I hope you'll get to join in our FB party by clicking here.

Happy Crafting!
Lisa

Wednesday, July 5, 2017

Loving Glimmer Paste on the MarkerPOP Blog

Hello!  I hope all of my American friends had a wonderful and safe 4th of July!  We had a blast with family, a pool party and late night fireworks for the past three nights in a row!  This morning, however, I'm popping in on the MarkerPOP Blog to share this super glimmery card that I've created using new to me Nuvo Glimmer Paste and a mix of Altenew goodies!


I hope you'll pop over there to see the full post, and how this card came together!  Each month one random commenter receives a $10 gc just for leaving some love! :)

Thanks so much and have an amazing day!
Happy Crafting!
Lisa

Sunday, July 2, 2017

Crafters Companion July 11th HSN Sneak Peek...

Woo hoo!  I'm popping in on this gorgeous Sunday morning to share a sneak peek at some more of the new goodies that will be available on HSN on July 11th!  If you would like to see a complete list of the products you can click this link.  Now onto my sneak peek...


Aren't these flowers gorgeous?!  These flowers are made with the new Quilling dies that will be available on HSN July 11th, and I LOVE them!  I have also used the Quilling paper pack that will also be available for purchase, and that work so beautifully with these dies.  To get nice full flowers I would recommend die cutting 3 of each type of flower, layer them together with strips of double sided adhesive along their bottom edge making sure to stagger the petals, and then you simply roll them inward to form the flower.  I do recommend using a liquid glue or hot glue gun on the edge to ensure that your flower will stayed rolled up.  You can also watch Sara's video on the Crafters Companion Facebook page on how she creates her flowers with this die.  Optional: I also added beads to the middle of mine by stringing the beads through floral wire and running the ends through the middle of my flowers.

Finally, I thought I would share a few of the projects that I've created with some of these flowers...


Aren't they so much fun?!  I can't wait to see what you'll make with yours!  And don't forget to join the Facebook party for our HSN July 11th release, it's always full of fun inspiration and giveaway! Woot woot!

Happy Crafting!
Lisa
 
BLOGGER TEMPLATE BY DESIGNER BLOGS