Showing posts with label card. Show all posts

Monday, September 21, 2015

Let's Party... Bold and Bright

It's Monday, woot woot!  We have just gotten back from our Disney Vacation last week ( that was why it was a bit quiet here hehehe! ), and trying to get back into the groove of things.  I am popping in to share this bright and bold card here and on The Alley Way Stamps Blog today...


This card is really bright and funky, isn't it?  It sort of came together by happy accident.  I had stamped the sentiment from the Big Time Stamp Set in versamark ink and embossed it in clear, just to play around with how it would look on colored paper.  Then while I kept looking at it I thought why not throw so fun splashes of color in various inks and watch it resist on the sentiment... hence, ta da! hehehe!  I adhered it all to some fun patterned papers and added some bright embellishments to tie the whole thing together!

So go on, get inky, have fun, get messy and just see what happens.. you might just surprise yourself!
Happy Crafting!
Lisa

Wednesday, September 16, 2015

Hello, hello, hello!

Hello!!! I'm so happy to be sharing a cute little card with the new Flap Happy Stamp Set from The Alley Way Stamps today...


I created this little window scene and can't help giggling every time I see it!  I love a card that does that, don't you?  The super cute little birds in this set are just too fun to play with!  I started by die cutting my little windows and tracing them onto my cardbase.  I then stamped my little birdies in each window and colored them in with various Copics.  I then decided they needed to look like they were indeed outside looking in so I added the sky with Broken China Distress Ink.  Finally I added my patterned papers and stamped my sentiment from the More Than Words Stamp Set.

I am linking this up to the Simon Says Stamp Challenge: Use A Stamp

Thanks for stopping by and Happy Crafting!
Lisa

Saturday, September 12, 2015

Faber Castell and Double Scoop Gellatos

Happy Saturday!!!!  I am up on the Faber Castell Design Memory Craft Blog today showing off some fun cards I created with Double Scoop Gellatos and an embossing folder...


I sure would love for you to visit and see how these cards were made!  It means so much to me, and thank you thank you thank you!!!!
Happy Crafting!
Lisa

Friday, August 7, 2015

I Whaley Love You...

Hello!  Earlier this week a new Stackaholic challenge went up on the DCWV blog and I wanted to share my take on it...


I was having all kinds of issues with getting my colors to look right with my photo editing software, but the picture below gives you a much better idea of how gorgeous this new Stack is...


The stack I used is called Ocean Breeze, and I can't get enough of the patterns, elements, and foiled silver this stack has to offer!  Take a look...

Yummy, right?!  Love it!  All of the new products are available at your JoAnn Stores so make sure you check out more!

Anywho, here is a peek at the card sketch, but make sure you stop by the DCWV blog to see what the layout sketch looks like too, and then join us!  At the end of the month a few lucky winners will be chosen!


Happy Crafting!
Lisa

Wednesday, July 22, 2015

Sending a Little Sunshine

Hello!!!  Today I am sending you all a little sunshine with this super happy card that I've created using the new Neener Neener Stamp Set from The Alley Way Stamps.  I must also mention that this set is the free with any $40 purchase this month, so double score!  Now let's check out my card...


Now this card came together quite easily and on a whim for me.  I'm going to use one of Virginia Lu's words and label this card a pot luck card.  This means I had random things laying on my desk from past projects and I mixed them all together to create this card!  Love it!  Since the distressed hill and frame were already done I then chose to diecut two yellow circles for dimension on my sun and stamped the face on top.  When I first laid this down and stamped my sentiment from the More Than Words Set I felt it looked bare, that's when I decided to add a background with stencils and distress ink to keep the colors cohesive.  I then added the arrow at the last minute and loved it! :)  Hope this card has brought you a smile today!

I am entering this into the Papertake Weekly Challenge: Build it Up

Happy Crafting!  And make sure you stop by The Alley Way Stamps Blog to check out more inspiration!
Lisa

Tuesday, July 14, 2015

Thinking of You with WPlus9

Hello!  I hope you've had a great start to your week so far!  I'm popping in to share a card I created for the newest WPlus9 Sketch Challenge that was created by the amazingly talented Joni Andaya Aptly titled, Get Sketchy with Joni, hehehe!

Here is what I've created:


Supplies Used:
WPlus9 Fresh Cut Florals ( sentiment )
WPlus9 Spring Wreath Die
Ranger WaterColor Cardstock
Patterned Paper: Heidi Swapp
Sequins: Pretty Pink Posh, The Ton, and V's Sweet Ideas
Peerless Watercolors
Heidi Swapp Color Shine

To create this card I started by adding lots of water to my watercolor cardstock and then dropping the watercolor in and letting it run.  Next I spritzed it with silver and navy blue color shine for more depth in color and for some fun splats around the edges.  I then set this to the side to dry.  Next I die cut the wreaths and flowers.  Using my stylus I curved the flowers petals up and glued the little flowers within the larger ones.  When my watercolored panel was dry I trimmed a diagonal cut and adhered patterned paper behind it.  I then stamped my sentiment, adhered the wreath with flowers and added the sequins as a finishing touch.

And here is a look at the sketch:


I am also linking this up to Simon Says Stamp Monday Challenge: Anything Goes
Thanks so much for taking the time to stop by!
Happy Crafting!
Lisa

Wednesday, June 24, 2015

Sweet Wishes

Hello!  Today I have a sweet card to share with you here and on The Alley Way Stamps Blog.  I am playing with the free stamp set of the month with a $40 purchase, Brain Freeze.  This set is so cute


To create this card I started by stamping the lollypop image repeatedly on various bright patterned papers.  I then trimmed just the tops.  After getting my black panel adhered to the card base I used complimentary mists and splattered them around.  I then popped the tops of the lolly's up with foam adhesive and cut toothpicks in half for the sticks.  I then stamped my sentiment on bright orange patterned paper before diecutting the flag shape around it.

I am entering this into the Simon Says Stamp: Favorite Technique - paper piecing, the Simon Says Stamp: Mist and Stamp Challenge, and into the


By the way a little enabling...


Thank you for stopping by and Happy Crafting!!!
Lisa

Sunday, June 21, 2015

Winnie and Walter Rerun Challenge

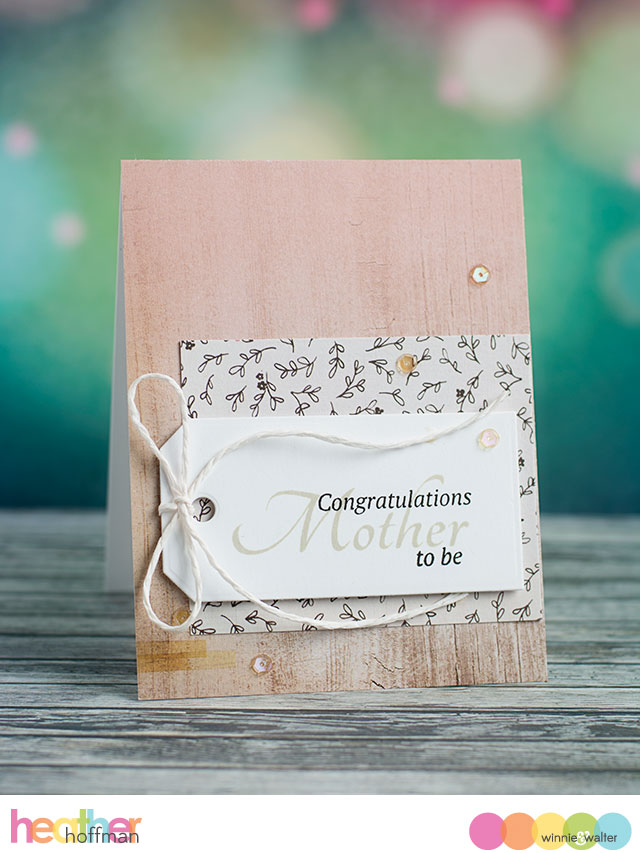
Hello!  Happy Father's Day to my amazing husband, my Dad and my Father - in - law.  I am so blessed to have so many amazing, kind, and supportive men in my life.  Today I am popping in quickly to share a card I created for the current Winnie and Walter Rerun Challenge.  This is the first rerun challenge they've had, and while I do not own the Parentville sets it also said you could create something inspired by the design team in that post.  Of course there was lots of inspiration to be had, but my eyes kept landing on the clean design of Heather Hoffman's first card "Congratulations Soon to be Mother,"  and since a couple of Father's day cards had still needed to be made I thought it was perfect.  Here is a look at my take on Heather's Card....


and here is Heather's Card:


I'm sure you can see many of the elements that inspired my in this card, from the woodgrain to the layout, as well as the stamping of lighter in the background to darker in the foreground for my sentiment.  I went with more masculine colors as well as a staple to hold on my twine instead of a bow.  The sequins also resemble more of a washer type of look on my card.

Supplies Used:
Patterned Paper: Echo Park This & That
Stamps: Winnie and Walter The Big The Bold and The Happy
Ink: PTI
Die: MFT
Sequins: Pretty Pink Posh

Thank you so very much for stopping by and Happy Crafting!!!
Lisa

Friday, June 19, 2015

Hello friend...

It's Fridayyyyyy!!!!  Yay!!!!!  Today I am sharing a fun and bright card here and on the SweetStamps.com Blog, and I am so excited as I tried a new to me technique on this card.  I'm not really sure what the name for this technique is so I'll just call it water stenciling, which as you probably already guessed means I used my peerless watercolors and one of the new stencils.


To create this look I merely laid down my stencil over watercolor cardstock making sure to use washi tape on all four sides and rolled a little under the cardstock to keep it in place.  I then spritzed my paper with water and dropped the color in by using a waterbrush and peerless strips,  (You can see how it looks in the photo below) letting the water do it's magic.


Next I stamped my girl on separate watercolor cardstock and colored her with the same peerless colors as well as some Distress Markers.  Tip: Make sure you allow for drying time before watercoloring two touching areas in different colors.

To finish the whole project and to follow the sketch I was inspired by I added a die cut tag in vellum, trimmed one corner and embossed my sentiment in white on black paper.  Finally I added three sequins in complimentary colors.

Challenges I was inspired by:
Runway Inspired Challenge #86:


Tuesday Morning Sketches #305:

And the Simon Says Stamp Challenge: Favorite Technique (watercoloring)

Supplies Used:
Peerless Watercolors
Tangagram Stencil
Bailey Glam Girl Stamp
Framed Handwritten Sentiments

Thanks so much for stopping by and I hope you have an amazing day!!!
Happy Crafting!
Lisa


Friday, June 5, 2015

Stencil and Distress Paint

Hello and Happy Friday, yay!!!!  Today you will find me here and on the SweetStamps.com Blog.  I recently got my hands on the Stainglass Stencil by SweetStamps.com, as well as some Tim Holtz Distress Paint.  Right now I only own one of these paints as I wanted to try it out before committing, but I can assure you more will be making their way to my home as I found it easy and fun to work with.


To create this card I started by placing my stencil over my paper, then I masked off the stencil so that only a circle showed.  Next I dabbed my distress paint over the open area, removed the masking and let it dry.  While I was waiting on this I stamped, colored and fussy cut the rose and leaves.  I had the gold die cut left over from another project and thought it was a perfect fit.  Once the paint was dry I stamped my sentiment and adhered the floral images and die.  I then finished it with some rhinestones.

Supplies Used:
Art Stencil STAINED GLASS as46007
 Distress PAINTS
 Simple Greetings Clear Stamp Set SS4404
 COPIC Sketch Markers (7)
 Rose & Leaf Bold 7014
 Elegant Leaves SweetCuts Die sc023
Rhinestones SPLIT PEA

I am entering this into the Loves Rubber Stamps: Anything Goes Challenge
and into the Papertake Weekly Challenge: Anything Goes

I hope you will also find some time to play in the current SweetStamps.com Challenge: Polka dots!

Happy Crafting!
Lisa

Thursday, June 4, 2015

Spray Ink + Glossy Paper

Hello!  It is Thursday folks and this little engine that could is still chugging, woo woo! You know me, and I always love to make a mess, so when I first saw the new Runway Inspired Challenge an idea popped in my brain and I thought, "what the heck, why not?"  My idea included some glossy paper, which I happened to have in my scrap stash, and some of my spray inks.  I have always loved the look of alcohol inks on glossy paper, but sadly own none of them... however, I think I might have found a small way to fix my need for them. Now just so we are clear, I am not saying these replace what you can do with alcohol inks, I've just found a way to get a similar look with products I happen to have on hand.  Let's take a look at my card first, and then I'll tell you what I did...


Now for the how to... I trimmed a strip of my glossy paper (I believe it might have been excess photo paper) and removed the nozzles on several of my ink sprays letting their coloring drip on the strip.  I let it sit for a few seconds and then went over the different colors in a wiping motion with a paper towel.  This gave me the marbleized look.  While this looked pretty cool as is I also wanted to capture the sparkle in the colors as seen in the challenge photo, so I added a strip of double sided adhesive and sprinkled with Hero Arts Prism Glitter. Ta - da!  The glitter also works as a sealant for the inks.  I then tucked it behind two black strips of cardstock to represent the coat in the photo.  Added the grey/white patterned paper to mimic the scarf, and finally I added black enamel dots to represent the black buttons.

Here is the photo that inspired me so much:


Thanks so much for stopping by and I hope you like my new little technique!
Happy Crafting!
Lisa

Supplies: Spray Ink: Heidi Swapp, Ranger; Die: Lawn Fawn; Enamel Dots: My Minds Eye

Wednesday, June 3, 2015

Here's the Scoop...

.... I went to go see New Kids on the Block, thanks to one of my Best Friends... yep... I still like them, and scream like a teenager when I see them in concert... bwhahahaha!  TMI? hehehe!  Anywho, Here's the scoop happens to also be my sentiment on today's card!


Supplies Used:
Stamps: The Alley Way Stamps - Slurp and Brain Freeze
Ink: Memento
Dies: Spellbinders and Pretty Pink Posh
Various Copics
Patterned Paper: Echo Park

Isn't this card just yummy?!  I'm so loving this month's release from The Alley Way Stamps, although I must admit I usually want ice cream when I start to get crafty with them, hehehe!  To create this card I started by stamping the ice cream image several times, colored them in and fussy cut them out.  I then trimmed my patterned paper panel, diecut a circle and two banners.  I decided my sentiment would look great on the yellow banner, and added a heart just because I love ice cream!  I them stacked my ice cream cone up, and ta da!!!

I am entering this guy into the Simon Says Stamp: Anything Goes Challenge

Happy Crafting!!!
Lisa

Tuesday, June 2, 2015

Sizzix Blog Hop with CardMaker Magazine - HUGE Giveaway


Hello and welcome to the Sizzix and CardMaker Magazine Blog Hop, yay!!!  I had the honor to work with the Sizzix Framelits Die Set - Card, Happy Birthday Step-Ups and the Sizzix Big Shot, which I have to say was a treat I never expected!  Thank you so much Sizzix!!!  The Big Shot has won my die cutting heart, and I know it's going to get it's work out daily.  Let's move onto all of the projects I created for this hop with the same die set...


I have created 3 very different cards for you today.  I really wanted to capture how versatile these dies can be, so that you don't feel limited/stuck with making the same type of card.  My first card is similar to that shown on the cover of this die set, and uses the dies as they are intended...
It was fun to mix and match the patterned papers with this step-up card, and the fun birthday themed dies that come with it.  I really like the look of step-up cards and various other shaped cards, but I usually don't take the time to create one, or I don't think about.  This is where this die set steps in and takes all of the guess work out.  Simply die cut and fold, and ta-da!  I also created a spot on the back of my card to write a more personal/detailed message...


Now for this next card I used softer, more feminine colors.  I also turned the scalloped rectangle dies onto their side and trimmed them to make decorative flags.  I then added a die cut cupcake in matching colors.  Finally I stamped my sentiment, and finished it all with some enamel dots...


My third card took some thinking outside the box, and I really felt like the two cupcake topper dies looked similar to clouds, so that is exactly what I turned them into!  I used the scalloped rectangles to frame and stamp my sentiment onto.


This hop will continue all week long, so I hope you will get a chance to peek at the various projects created by both the Sizzix team and the CardMaker Blog team.  From here you will visit Adrianne Surian: http://happyhourprojects.com/hello-sunshine/ tomorrow on June 3rd.  

**There is also a HUGE giveaway with this hop, so make sure you click over to the Sizzix Blog to find details on how to get yourself entered!!! Hint: Big Shot Machine, 3 die sets and a 1 year Subscription to CardMaker Magazine?! Ah-mazing!!!!


Supplies Used:
Card #1: Dies: Framelits Step-Ups (Stephanie Barnard Sizzix); Die Cutting Machine: Big Shot (Sizzix); Patterned Paper: Hootenanny 6 x 6 (My Mind's Eye); Sequins: Clear (Pretty Pink Posh), Other; Gold thread; Cardstock: Mint, Yellow and Peach; Adhesive: Multi Mono Liquid Glue (Tombow)

Card#2: Dies: Framelits Step-Ups (Stephanie Barnard Sizzix); Die Cutting Machine: Big Shot (Sizzix); Patterned Paper: Nine & Co. (Teresa Collins); Clear Stamps: Dandelion Dreams (Clearly Besotted Stamps); Ink: Versafine - Onyx Black (Tsukineko); Enamel Dots: Sweet Dots (V's Sweet Ideas), Memories (Teresa Collins)

Card#3: Dies: Framelits Step-Ups (Stephanie Barnard Sizzix); Die Cutting Machine: Big Shot (Sizzix); Patterned Paper: Cut & Paste (My Mind's Eye); Clear Stamps: All About You (The Alley Way Stamps); Ink: Versafine - Onyx Black (Tsukineko) Sequins: Evening Shoot Mix (The Ton Stamps)


Thanks so much for stopping by, happy hopping and crafting!!!
Lisa

Sunday, May 31, 2015

The Alley Way Stamps June Blog Hop Day!!! *Giveaway*

Hello!!!!!  It is hop day at The Alley Way Stamps, woot woot!  Time to have fun, be inspired and maybe be a winner!  Before I get into the giveaway info. I want to share a cute and simple little card I've created using the new Twinkle Toes Stamp Set...


To create this card I started by making my mini little envelope out of Patterned Paper.  I then adhered it to the card base so I would have an idea where I wanted to stamp my little snail and sentiment.  Once they were stamped I went over them with Copics.  I then trimmed a little note to go inside the envelope and stamped a sentiment from the older Say It Don't Spray It Stamp Set and added a little lady bug from the Twinkle Toes Set in the corner.  Add a bow to the front of the envelope and viola!
There are so many cute little guys and girls in this set that you will have a blast getting inky!

Now onto some giveaway information...  There is a rafflecopter found on The Alley Way Stamps Blog, with various ways for you to gain entries to win ALL 3 New SETS!!!!
You can pick and choose which ones you want to do, but the more you comment, the more chances you have to win!

For our friends that are not on Social Media, you can comment below to win - we will randomly pick from either the Rafflecopter participants or commenters!

This runs today only (May 31, 2015), so don't miss out on your chance to win!


And....
This super fun Mini Set, Brain Freeze, is FREE when you spend $40.00 
or more during the month of May 2015.


So, are you ready to hop???!!!
Lisa - You are here
Marina - Go here next

Thanks so much for stopping by and Happy Crafting!
Lisa

Saturday, May 30, 2015

Thoughts and Prayers...

Happy Saturday!!!  This time of year has been exceptionally busy for me this year, but I've begun to find that if I allow myself those little moments of playtime with my crafting goodies, then all of the other projects I need to get done come together more quickly... I guess it's true what they say all work and no play would make me a dull girl.  So I am glad I had a chance to play along with this month's Altenew Challenge!  I absolutely adore the Altenew Challenges and their products, so it's always relaxing and fun for me to play along.  Here is what I've created this time...


Supplies Used:
Stamps: Altenew (Striped florals, Sentiments and Quotes)
Distress Markers: Tim Holtz
24 k Gold Embossing Powder: SweetStamps.com ( this is seriously my favorite embossing powder ever)
White Embossing Powder: SweetStamps.com
Watercolored Cardstock: Ranger
Petaloo Watercolored Brush
Embossed Vellum
Cutterbee Scissors
Foam Adhesive: Scotch

 I love watercoloring, it is so relaxing to me, and the results are always different.  I stamped and embossed the leaves onto black cardstock and then fussy cut them.  Next I stamped and embossed the flower images onto watercolored cardstock.  I then used my blue distress markers and a waterbrush to pull the colors from the inside out.  Once everything was dry I fussy cut the floral images and arranged them onto an embossed vellum panel.  Finally I stamped and embossed my sentiment before adhering it with foam.  I chose not to use any other embellishments and I felt the stamping and shine in the embossing powder was enough to draw the eyes in.


Here is the Challenge photo that inspired me this month:


I am also linking this up to the Simon Says Stamp: Anything Goes Challenge
and in the Addicted to Stamps and More Challenge: Anything Goes
as well as the Marker Pop Blog Challenge: Flowers ( I used distress markers )

Thank you so much for stopping by and Happy Crafting!
Lisa

Friday, May 29, 2015

Many Thanks...

Hello!  Today I am sharing a card here and on the SweetStamps.com blog that was very much inspired by the amazing Jennifer McGuire... you can visit her blog to read and watch more on how the technique I use works.  After watching her video I immediately thought of the Daisy Center Medallion Die from SweetStamps.com, and knew it would be perfect for this technique...


The results are stunning in person! I loved how soft the inlaid image was, so I choose to keep it simple and stay all white, except for the sentiment which was stamped in the same color as the inlaid faux waterpressed image.

Supplies Used:
Daisy Center Medallion SweetCuts Die sc052
Shades™ Dye Ink Cube RASPBERRY
 Framed Handwritten Words Clear Stamp Set SS4406

I am also entering this into the Simon Says Stamp Monday Challenge: Thank you
and the Addicted to Stamps: Anything Goes


Have a wonderful weekend, thanks for stopping by, and Happy Crafting!
Lisa

Wednesday, May 27, 2015

Best Fishes...

Hello!!!  Today I am sharing a super sweet and super fishy card here and on The Alley Way Stamps Blog...


Supplies:
Stamps: The Alley Way Stamps - All Washed Up, Gill-Friend, and Little Fellas
Ink: Memento
Magicals
Watercolor Cardstock
Various Copics
Embossing Powder
Foam Adhessive
Glossy Accents

This card was so fun to create, especially the background!  I started by spritzing watercolor cardstock  with lots of water and then sprinkled some Magicals in green and blue and watched them do their thing.  While that dried I stamped the fish, colored them in and fussy cut them out.  I then embossed my sentiment onto vellum.

I am entering this into the following challenge:
Crafting From the Heart - Anything Goes
Addicted to Stamps: Anything Goes

Thanks so much for stopping by and Happy Crafting!
Lisa

Thursday, May 21, 2015

Wishing You Happiness...

Hello!  This is my second post for today, so if you would like to see my home decor house rules that I made with DCWV goodies I'd love for you to stick around and scroll down! :)

Now I'm going to share a card I created, literally just this morning!  I love trying and exploring new color combos so when i saw the newest challenge at Cupcake Inspirations I just had to get crafty...


And here was my inspiration...


Isn't this color combo just gorgeous!!!  This card was super easy to create... I started by trimming my patterned paper and then trimming the center at an angle.  I then stamped my sentiment before adhering the patterned paper.   Next I diecut the butterfly, adhered the two cuts together, added some glitter to the body and tucked it right at the top corner of the sentiment.  The enamel dots were the icing on the cake, no pun intended ( ok screw it, pun was totally intended me = dork )!

Supplies Used:
Patterned Paper: Amy Tan
Stamp: Clearly BeSotted
Die: Spellbinders
Enamel Dots: Teressa Collins

Have a fabulous rest of the day and hope to see you back here tomorrow!
Happy Crafting!
Lisa

Wednesday, May 13, 2015

Hey Little Fella...

Hello!  Happy Mid of the week to ya!  Today you will find this square cutie here and on The Alley Way Stamps Blog.  My son loves sharks ( not many boys don't hehehe! ) and when I saw the shark images in the new stamp sets: Something's Fishy and Little Fellas I had to do something with them...


To create this card I started by using white embossing paste and a stencil for my background, while it was still wet I threw on some sparkly glitter.  Once this dried and spritzed with two different blues, and wiped off the excess on the embossing.  I then stamped the sharks on separate cardstock, colored them and added a layer of glossy accents for that shine you see in the second photo.  When the glossy accents were completely dried I fussy cut the sharks and adhered them with foam adhesive.  Next I stamped and diecut the sentiment banner, before stapling it to the front. Part of the sentiment came from the Gill Friend Stamp Set, which is the free set of the month with any $40 purchase.

I am entering this little guy into the Simon Says Stamp Challenge: Sentimental

Make sure to stop by The Alley Way Stamps Blog for more inspiration today!

Happy Crafting!
Lisa

Friday, May 8, 2015

Embossing, Stenciling and Patterned Paper... Oh my!

Hello!  It's another beautiful Friday and I am here to share a card I've created for here and for the SweetStamps.com Blog.  I have been having a blast with stencils lately and I'm so excited with how this card turned out...


Supplies Used:
Art Stencil MOROCCAN TILE as46008
 Framed Handwritten Words Clear Stamp Set SS4406
 Elegant Leaves SweetCuts Die sc023
 Distress INK PADS
 Heat Embossing Tool
Self-Adhesive Pearls PEARL

This card is all about the background.  To create the background I started with a panel of patterned paper from DCWV.  I then temporarily adhered my stencil to the patterned paper and went over it with versamark ink.  Next I went over it with clear embossing powder and heat set.  Finally I went over all of this with two distress inks and fill in between the embossed areas.  In person this card has a beautiful shine to the background.  I finished the card by embossing the frame, stamping the sentiment and fussy cutting.  Then I diecut the leaves for a finishing touch.

I am adding this to the Virginia's View Challenge: Layering
and Simon Says Stamp Wednesday Challenge: Sentimental

Also feel free to link up to the SweetStamps.com Challenge: For Mom

Thanks so much for stopping by and Happy Crafting!
Lisa
 
BLOGGER TEMPLATE BY DESIGNER BLOGS