Tuesday, June 30, 2015

TAWS Blog Hop Day with Giveaway!!!

Hello, hello!  Happy TAWS Blog Hop Day, yay!!!!!  I picked to work with the Cha Cha Cha Stamp Set today... first of all this set has a pretty fun name, come on say it out loud... you know you want to, and second because of the super fun images!  I went total party theme with this one...


Ole!  hehehe!  Don't you love it?  To create this card I started by stamping my donkey piƱata onto matching kraft cardstock, colored with various Copics and fussy cut.  I then added the twine behind him so he could be all set for a good wacking, hehehe!  Then I stamped my sentiment and added fun confetti by using my hole punch and various scrap patterned papers.  Finally I used an edge punch for the bottom edge.

Now let's talk about the goodies to be won... after all this is a release blog hop!

Today's winner will get all FOUR new sets!

If you want to be that winner, all you have to do is follow the Rafflecopter instructions found on The Alley Way Stamps Blog! We are releasing an extra set this month!!!!!

You can pick and choose which ones you want to do, but the more you comment, the more chances you have to win!

For our friends that are on not Social Media, you can comment below to win - we will randomly pick from either the Rafflecopter participants or commenters!

This runs today only (JUNE 20, 2015), so don't miss out on your chance to win!


And one more bit of good news to share before you go...


This super adorable Mini Set, Neener Neener, is FREE when you spend $40.00 
or more during the month of July 2015.


So, are you ready to hop???!!!

Lisa - YOU ARE HERE
Marina - GO HERE NEXT
Yuki

Happy Crafting/Hopping!
Lisa

Monday, June 29, 2015

The Alley Way Stamps Sneak Peek Day#3

It's sneak peek time, it's sneak peek time, du du du!!!  Happy Dancing for all!!!!!  If you happen to just stumble on my blog then you are going to want to finish the rest of this post and then head over to the Alley Way Stamps blog where you will find more sneaks for the new set Old School, a total must have for any 80's lover, and for info. on how you can win the set before it is fully released!!! woot woot!!!  First things first, take a look at what I made...


It's Pac Man and Mrs. Pac Man!!!!  Say what?!!!!!  And that sentiment, hehehe!  It just keeps me laughing!  Love it!  And just think... this is just a peek at how much this set is going to rock your world!  Go check out more now on The Alley Way Stamps Blog!

This card was simple to make.  It started with embossing the dots and sentiment with Versamark and heat embossing them in white on black paper.  Next I stamped, colored and fussy cut the pac mans ( I should add that Mrs. Pac Man is a mirror image, I first stamped her onto acetate and rubbed it quickly onto my paper so they could face each other.) and the cherries before adhering them with foam adhesive.  I then adhered my panel at an angle for added interest.

I am adding this little guy into the Simon Says Stamp Challenge: Anything Goes

Thanks so much for stopping by and Happy Crafting!
Lisa

Friday, June 26, 2015

Happy 4th... just a touch early, hehehe!

But hey, I figure early is better than late, right?  So today I'm sharing this fun firework filled card here and on the SweetStamps.com Blog...


When I first started working on this card I was simply playing around to see how it would turn out stamping and embossing the fireworks in various embossing and enamel powders... then when it was done I loved it so much I had to use it... but where to put a sentiment?  Then vellum came to the rescue!  With a little embossing and some stickers... ta da!

I am entering this into the Simon Says Stamp Challenge: Anything Goes

Thanks so much for stopping by!!!
Happy Crafting!
Lisa

Supplies Used:
Stamps: Fireworks Clear Stamp Set and Handwritten Sentiments Clear Stamp Set
Ink: Watermark Ink Pad
Embossing Powders: Diamonds and Pearls, White, Black Sparkle
Embossing Enamel: 24k Gold, Deep Blue Sky, Siam Silver, Cranberry Wine
Vellum
Stickers


Wednesday, June 24, 2015

CardMaker Magazine Blog Post

Hello!  Today I am up on the CardMaker Magazine Blog sharing a step by step photo tutorial for a trifecta of techniques including stenciling, heat embossing and watercoloring. woo hoo!  I would love if you had time to stop over there give a little hello and check my how to on this technique... as always I have a little sneak to share with you here...


Thank you so much and Happy Crafting!
Lisa

Sweet Wishes

Hello!  Today I have a sweet card to share with you here and on The Alley Way Stamps Blog.  I am playing with the free stamp set of the month with a $40 purchase, Brain Freeze.  This set is so cute


To create this card I started by stamping the lollypop image repeatedly on various bright patterned papers.  I then trimmed just the tops.  After getting my black panel adhered to the card base I used complimentary mists and splattered them around.  I then popped the tops of the lolly's up with foam adhesive and cut toothpicks in half for the sticks.  I then stamped my sentiment on bright orange patterned paper before diecutting the flag shape around it.

I am entering this into the Simon Says Stamp: Favorite Technique - paper piecing, the Simon Says Stamp: Mist and Stamp Challenge, and into the


By the way a little enabling...


Thank you for stopping by and Happy Crafting!!!
Lisa

Monday, June 22, 2015

Avery Elle and CardMaker Magazine Blog Hop and Giveaway!!!!


Hello, and hoorayyyyyy it's a blog hop day!!!!!  I'm so excited to be here with you today, and getting to share some cards I've made with some of the newest products too!  I was lucky to receive the Geek Love Stamp Set and Co-ordinating die set from Jamie at Avery Elle, and I was just tickled pink when I finally saw them in person.  They are seriously the cutest!  Take a peek at what I've created with them....


Isn't she just so fun, and so adorkable?!  I LOVE it!!!  What I really love is how different you can make her look with all of the fun mix and match images that are found in this set.  There is also a very handsome lad in this stamp set too, for those of you who might be in need of some masculine dorkiness, hehehe!

Now for my second card I played more with the co-ordinating die set, and had just has much fun!  From cute and fun to more elegant these dies are so versatile... take a peek...


To create the ombre heart I die cut the heart die three times in three colors all in the same family of pink.  Then while holding all three together at one time I eyeballed it and cut the heart into thirds.  Finally I arranged the cuts from lightest to darkest before gluing them inside the negative heart space.  I really love that there is stitching left around the negative cut too!


Well that is all I have for you today, but there is lots more inspiration to be had from the amazingly talented Melania's blog as well as the other hop participants.  And of course no hop is complete without a giveaway, so if you hop along you will be in the running for a $30 gc to Avery Elle... woo hoo!!!!  Make sure you go to their Blog post for full details on how to get entered.
With that being said I would like to end this post with a HUGE thank you to Jamie from Avery Elle for the stamp and die set I was provided with for this hop. I LOVE them!!!!  Seriously!  A thank you to everyone who is in the hop and always providing such amazing inspiration.  And finally a thank you to YOU for taking the time to stop by, visit, leave a little love and all of the support you continue to show.
Happy Crafting/Hopping!
Lisa 

FOR YOU... simple stamping

Hello!  I hope you had a nice weekend!  I'm welcoming the week with simplicity... sometimes I get so wrapped up in techniques, embellishments and everything else that I forget one of my first loves... stamping... so I am sharing this card here and on The Alley Way Stamps blog.


Simple, and def. not boring.  I hope this card reminds you to think about your "first loves" in crafting, and maybe even inspire you to take it back to the basics.

I am entering this into the following challenge:
Simon Says Stamp: Favorite Technique/Product


Supplies Used:
Stamps: The Alley Way Stamps (Pick One and Lite Brite)
Ink: MFT Hybrid Black
Cardstock: PTI
MISTI

Happy Crafting!!!
Lisa

Sunday, June 21, 2015

Winnie and Walter Rerun Challenge

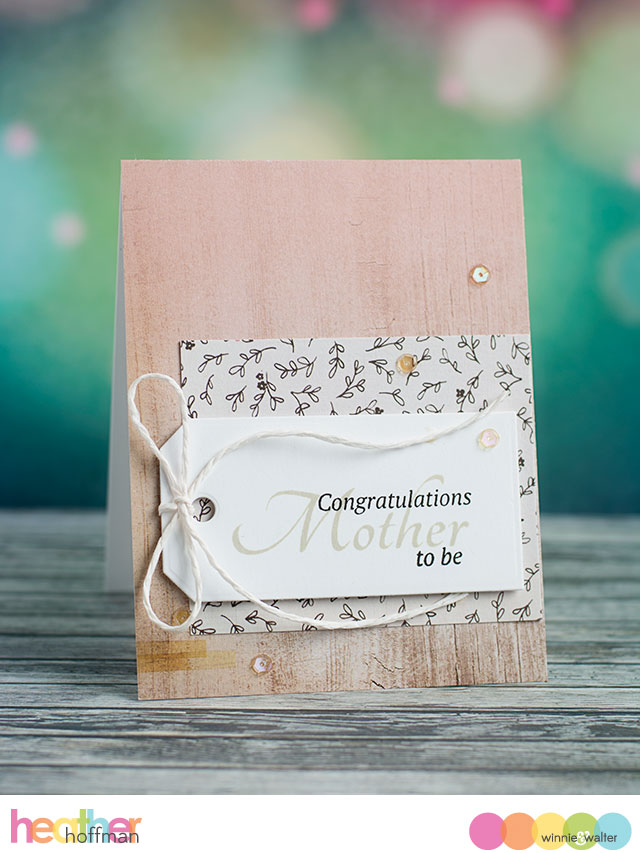
Hello!  Happy Father's Day to my amazing husband, my Dad and my Father - in - law.  I am so blessed to have so many amazing, kind, and supportive men in my life.  Today I am popping in quickly to share a card I created for the current Winnie and Walter Rerun Challenge.  This is the first rerun challenge they've had, and while I do not own the Parentville sets it also said you could create something inspired by the design team in that post.  Of course there was lots of inspiration to be had, but my eyes kept landing on the clean design of Heather Hoffman's first card "Congratulations Soon to be Mother,"  and since a couple of Father's day cards had still needed to be made I thought it was perfect.  Here is a look at my take on Heather's Card....


and here is Heather's Card:


I'm sure you can see many of the elements that inspired my in this card, from the woodgrain to the layout, as well as the stamping of lighter in the background to darker in the foreground for my sentiment.  I went with more masculine colors as well as a staple to hold on my twine instead of a bow.  The sequins also resemble more of a washer type of look on my card.

Supplies Used:
Patterned Paper: Echo Park This & That
Stamps: Winnie and Walter The Big The Bold and The Happy
Ink: PTI
Die: MFT
Sequins: Pretty Pink Posh

Thank you so very much for stopping by and Happy Crafting!!!
Lisa

Friday, June 19, 2015

CardMaker Magazine Inspired and on the Blog

Hello!!!  Today I'm sharing a card on the CardMaker Magazine Blog that was inspired from a card in the Spring 2015 issue, so I would love if you could take a moment to see both cards on their blog today!
Here's a peek at mine... ok really it's just what mine looks like, but read more over there!


Happy Crafting!
Lisa

Hello friend...

It's Fridayyyyyy!!!!  Yay!!!!!  Today I am sharing a fun and bright card here and on the SweetStamps.com Blog, and I am so excited as I tried a new to me technique on this card.  I'm not really sure what the name for this technique is so I'll just call it water stenciling, which as you probably already guessed means I used my peerless watercolors and one of the new stencils.


To create this look I merely laid down my stencil over watercolor cardstock making sure to use washi tape on all four sides and rolled a little under the cardstock to keep it in place.  I then spritzed my paper with water and dropped the color in by using a waterbrush and peerless strips,  (You can see how it looks in the photo below) letting the water do it's magic.


Next I stamped my girl on separate watercolor cardstock and colored her with the same peerless colors as well as some Distress Markers.  Tip: Make sure you allow for drying time before watercoloring two touching areas in different colors.

To finish the whole project and to follow the sketch I was inspired by I added a die cut tag in vellum, trimmed one corner and embossed my sentiment in white on black paper.  Finally I added three sequins in complimentary colors.

Challenges I was inspired by:
Runway Inspired Challenge #86:


Tuesday Morning Sketches #305:

And the Simon Says Stamp Challenge: Favorite Technique (watercoloring)

Supplies Used:
Peerless Watercolors
Tangagram Stencil
Bailey Glam Girl Stamp
Framed Handwritten Sentiments

Thanks so much for stopping by and I hope you have an amazing day!!!
Happy Crafting!
Lisa


Wednesday, June 17, 2015

For You...

Hello!  This is post number 2 for me today, so if you get some time to scroll down you'll find a fun card I created for the Nani Ke Ola Blog using gold foil embellishments, a stencil and spray mists.... Any who, onto my next creation I'm excited to share with you today...

I haven't made a tag in a while, so I decided that was what I was going to do with some of my new stamps from The Alley Way Stamps. But I didn't want to make the every day tag, I wanted one that might carry you away...


To create this tag I started by dieting my tag shape out of watercolor yardstick.  Next I heat embossed my sentiment from the Lite Brite Stamp Set in clear embossing powder.  Next I used 3 gradient ink colors to watercolor from dark to light.  While this dried I stamped my flower and fairy image from the Twinkle Toes Stamp Set, colored and fussy cut.  For the fairy I then did a little image surgery and trimmed between her arms so she could carry my tag away with her.  I also added some fun glitz to her wings with tickles.  I adhered these to the tag along with some clear sequins in various sizes.  Added the ribbon, and ta-da!

I was inspired by the current Virginia's View Challenge: Monochromatic/Ombre

Thanks so much for stopping by!
Happy Crafting!
Lisa

Sending Love...

Hello, hello!!!  Today I am over on the Nani Ke Ola Blog sharing a fun card that I've created using a Stencil, Gold Foil Embellishments, and mist.  Take a peek and I hope to see you over there...


Happy Crafting!
Lisa

Monday, June 15, 2015

Desert first!

Hello!!!!  Happiest Monday to you!  I am back after an awesome weekend of getting together and catching up with old College friends and ready to share more crafting fun with you today.  This little card can be found here and on The Alley Way Stamps Blog...


Supplies Used:
Stamps: The Alley Way Stamps ( Brain Freeze, Slurp, and Face It )
Ink: Memento and Hero Arts
Various Copics
Patterned Paper: Echo Park
Sequins: Pretty Pink Posh and V's Sweet Ideas
Foam Adhesive

Isn't this card just too cute?  And perfect for a hot summer day, like the ones we've had around here lately.  Anywho, this little guy was created by first stamping my images down the side of a panel, colored and then fussy cut along the one side.  Next I stamped the middle guy and his face onto seperate cardstock, colored again and fussy cut.  He was then popped up for added dimension.  I then stamped the sentiment, which I completely agree with might I add, adhered the whole thing up on some patterned paper with more foam adhesive.  And finally came the mix of sequins for embellishment sake.

I am entering this into the following challenges:
CAS Colors and Sketches:
Anything but a Square Card: Whimsy Stamps Challenge

Happy Crafting and thanks for stopping by!
Lisa

Friday, June 12, 2015

Stencil Sneak Peek at SweetStamps.com

Hello!  It is Friday, yay!!!!  And this weekend I will be at our 10 year college reunion at The University of Dayton, so excited!!!  Right now I'm sharing a card that features a soon-to-be released stencil ( available June 15th ) here and on the SweetStamps.com blog.


This card is another one that you can whip up quickly and make multiples of by changing colors/sentiment. I started by laying my stencil on a strip of cardstock and went over it with distress ink and my blender tool.  I then trimmed it and adhered it to my cardbase.  On a separate cardstock I stamped the floral image and colored it in with colored pencils before I fussy cut it.  I then popped it up with some foam adhesive.  Finally I stamped my sentiment and added my rhinestones.

Make sure you link all of your crafty projects up to our newest challenge: Anything Goes.... seriously ANYTHING!!!!  Link up with a SweetStamps.com and you get a second entry woot woot!

I am also linking this up to the Simon Says Stamp Monday Challenge:  For the Love of Plants

Thanks so much for stopping by!
Happy Crafting!
Lisa

Wednesday, June 10, 2015

Wish Big...

Hello!  Today I'm sharing a fun birthday card made with a few of the new stamps from The Alley Way Stamps called Lite Brite and Slurp


To create this card I actually worked a bit backwards.  I started by stamping my sentiment and cake image.  Next I colored the cake and candle in with various Copics, and added dots of shimmer to my sentiment with Stickles.  After it all dried I decided it needed something around the edges.... so that's when i diecut it, ha!  Thank goodness my rectangle die was the perfect shape for what I had already done.  After adhering it to some fun DCWV Birthday paper I wanted to do more... and that's when the circle die cut that was sitting in my scrap stash looked like a good idea, and ta - da!  My little twine bow was the last thing to add.

Supplies Used:
Stamps: The Alley Way Stamps ( Slurp and Lite Brite )
Ink: Memento Tuxedo Black
Patterned Paper: DCWV The Birthday Wishes Stack
Various Copics
Stickles: Ranger
Dies: LF and PTI

I am adding this to the Addicted to Stamps Challenge: Make Your Mark and MarkerPoP Anything Goes Challenge

Thanks so much for stopping by and Happy Crafting!
Lisa

Gone Fishin' Layout and new Magicals Technique

Hello!  Today you will find me sharing a cute layout of my husband with our youngest on her first time fishing here and on the Nani Ke Ola Blog... I'm also going to share a new technique I used with my Magicals to create my own patterned paper.  First let's see the layout...


To recreate this look you will need watercolor cardstock, Magicals by Lindy's Stamp Gang, a Stencil, Paint Brush, Mini Mister, and a Baby Wipe.  I adhered my stencil to the watercolor cardstock with washi tape to keep it from moving.  Next I spritz the whole paper with water in my mini mister ( any spray bottle will work ).  I then dipped my paintbrush into my magical powder, one at a time, and tapped it onto the openings in the stencil.  I did this randomly with various colors until each butterfly in my stencil had some of the Magicals pigment on it.  I spritzed the stencil one more time and then gently went over each butterfly with a wet baby wipe.  Slowly remove the stencil and ta - da!  I love when I can create my own designs like this, and if I were going for a more specific color pallet I could work with just one or two colors.

I was also inspired by the Paper Issues: Mister Fix It Challenge

Thanks so much for stopping by today and Happy Crafting!
Lisa

Supplies Used:
Patterned Paper: Heidi Swapp Mixed Company
Magicals: Lindys Stamp Gang in Boardwalk
Stencil: Prima Marketing and 7 Dots Studio
Embellishments: Pretty Little Studio - Holiday Phrase Strips, Elle's Studio - Letters and Numbers in Teal, Pinkfresh Studios - Foil Diecuts, Heidi Swapp - Mixed Company Ephemera

Tuesday, June 9, 2015

Altenew + Ellen Hutson

Hiya!  Today I'm playing along with the Essentials by Ellen June Mix-It Up Challenge with Altenew... woo hoo!!!  Two great companies mixed, sounds like my kind of challenge...


Supplies Used:
Dies: Essentials By Ellen
Stamps: Altenew
Vellum with Foil: DCWV
Gold Foil: DCWV
Sequins: Pretty Pink Posh
Ink: Versafine and Colorbox

This card is a very clean, simple, and easy to replicate card.  There are no real tricks, other than I used vellum to diet with, and for the leaf I chose to leave the center pieces intact.  Sometimes a simple card is all that is needed.

I am also entering this into the Simon Says Stamp Monday Challenge: For the Love of Plants

Thank you so much for taking the time to visit.
Happy Crafting!
Lisa

Monday, June 8, 2015

CardMaker Magazine Tips and Tricks Post

Hello!  This is post #2 for me today, so if you have time I would love for you to click back and visit my Fairy Kisses Card sharing the new Alley Way Stamp Set Twinkle Toes.  You will also find me on The CardMaker Magazine Blog today sharing some tips and tricks when working with vellum...


I'd love for you to pop on over and see the full post, it makes my day to see my readers visit there too!  Thank you so much!!!!
Happy Crafting!
Lisa

Fairy Kisses at Night

Hello!  I hope you had a nice weekend!  Today you will find me here and on The Alley Way Stamps Blog sharing this mystical little night scene with the new Twinkle Toes Stamp Set...


Supplies Used:
Stamps: Twinkle Toes and Ta-da! from The Alley Way Stamps
Various Copics
Distress Inks
Embossing Powder: Clear and 24k. Gold
Ink: Memento
Foam Adhesive

Isn't she so fun?  I wanted to really get creative with this set, and that meant with my coloring too.  So I chose fun, bright colors.  I also wanted my mushrooms to appear like they were glowing in the dark, so that is why I chose the blues and greens on top.

I am entering this into the Marker Pop Anything Goes Challenge

Thanks so much for stopping by!
Happy Crafting!
Lisa

Saturday, June 6, 2015

2 hops and a challenge, say what?

Hello and Happy Weekend, yay!!!!!!  We have gorgeous weather this morning, and nothing we have to do! SCORE!!!!  Anywho, I'm popping in real quick to post a card that I created after I woke up... I was really inspired by the video that Laurel Beard created, but since I don't have any of the Ken products I used something similar called Magicals by Lindy's Stamp Gang and created this...


Isn't this so fun and abstract?!  I love it and can't wait to do more as it is soooo simple!  First I stamped and heat embossed my Verve images in clear onto watercolored cardstock, then I simply watered down my cardstock with a spray, flicked some Magicals in green and purple onto my cardstock, spritzed some more and let the colors run.  I really love how I actually got more than just the two colors I put on as the Magicals are a tiny powder of mixed colors themselves.

I was inspired by two hops and a challenge this morning:
Watercolor Blog Hop with Pretty Pink Posh
Summer Coffee Lovers Blog Hop
Verve Eat Me Drink Me Diva Challenge

Thanks so much for taking time to visit little ol' me!  Have a fantastic day and Happy Crafting!
Lisa

Friday, June 5, 2015

Watercolor Hop with some MFT

I'm baaaaackkkk!  A third time today, woot woot!  I just couldn't help myself and had to do more watercolor fun for the current Pretty Pink Posh Watercolor Hop... I was also inspired by the recent MFT Card Challenge Sketch to create this cutie...


I just love her!  All of the Pure Innocent Stamps are always so darn cute!  Anywho, I tried to do some no line watercoloring, but I'm not quite sure how well I succeeded... I'm not going to totally bash it as I am proud of my first attempt, and I can only get better right?

Supplies Used:
Patterned Paper: American Crafts Dear Lizzy
Stamps: MFT
Ink: Distress Ink by Ranger, Memento
Distress Markers: Ranger
Waterbrush: Prima
Sequins: Pretty Pink Posh

Here is the MFT sketch that helped inspire my design...


Thanks so much for stopping by again and Happy Hopping!
Lisa

Watercolor Hop You're Fantastic...

Hello!  If you didn't get to see my earlier post for SweetStamps.com, I'd love for you to click back and see it!  Now I'm playing along in the new Pretty Pink Posh Watercolor Hop, and I'm so excited!!!  I LOVE watercoloring, and we all know how hot it is in our community right now.  For my first card I started out with some basic watercolored background and image with my distress markers and waterbrush...


Supplies Used:
Stamps: Lawn Fawn
Ink: Versafine by Tsukineko
Distress Ink Markers:Tim Holtz/Ranger
Mr. Huey in Black: Studio Calico

hehehe!  It's a fan with a mustache!!!! bwahahahaha!!!

I am also entering this into the Simon Says Stamp Masculine Challenge

Hope it makes you smile too, and I hope you'll get a chance to stop by later for more inspiration!
Happy Hopping/Crafting!
Lisa

Stencil and Distress Paint

Hello and Happy Friday, yay!!!!  Today you will find me here and on the SweetStamps.com Blog.  I recently got my hands on the Stainglass Stencil by SweetStamps.com, as well as some Tim Holtz Distress Paint.  Right now I only own one of these paints as I wanted to try it out before committing, but I can assure you more will be making their way to my home as I found it easy and fun to work with.


To create this card I started by placing my stencil over my paper, then I masked off the stencil so that only a circle showed.  Next I dabbed my distress paint over the open area, removed the masking and let it dry.  While I was waiting on this I stamped, colored and fussy cut the rose and leaves.  I had the gold die cut left over from another project and thought it was a perfect fit.  Once the paint was dry I stamped my sentiment and adhered the floral images and die.  I then finished it with some rhinestones.

Supplies Used:
Art Stencil STAINED GLASS as46007
 Distress PAINTS
 Simple Greetings Clear Stamp Set SS4404
 COPIC Sketch Markers (7)
 Rose & Leaf Bold 7014
 Elegant Leaves SweetCuts Die sc023
Rhinestones SPLIT PEA

I am entering this into the Loves Rubber Stamps: Anything Goes Challenge
and into the Papertake Weekly Challenge: Anything Goes

I hope you will also find some time to play in the current SweetStamps.com Challenge: Polka dots!

Happy Crafting!
Lisa

Thursday, June 4, 2015

Spray Ink + Glossy Paper

Hello!  It is Thursday folks and this little engine that could is still chugging, woo woo! You know me, and I always love to make a mess, so when I first saw the new Runway Inspired Challenge an idea popped in my brain and I thought, "what the heck, why not?"  My idea included some glossy paper, which I happened to have in my scrap stash, and some of my spray inks.  I have always loved the look of alcohol inks on glossy paper, but sadly own none of them... however, I think I might have found a small way to fix my need for them. Now just so we are clear, I am not saying these replace what you can do with alcohol inks, I've just found a way to get a similar look with products I happen to have on hand.  Let's take a look at my card first, and then I'll tell you what I did...


Now for the how to... I trimmed a strip of my glossy paper (I believe it might have been excess photo paper) and removed the nozzles on several of my ink sprays letting their coloring drip on the strip.  I let it sit for a few seconds and then went over the different colors in a wiping motion with a paper towel.  This gave me the marbleized look.  While this looked pretty cool as is I also wanted to capture the sparkle in the colors as seen in the challenge photo, so I added a strip of double sided adhesive and sprinkled with Hero Arts Prism Glitter. Ta - da!  The glitter also works as a sealant for the inks.  I then tucked it behind two black strips of cardstock to represent the coat in the photo.  Added the grey/white patterned paper to mimic the scarf, and finally I added black enamel dots to represent the black buttons.

Here is the photo that inspired me so much:


Thanks so much for stopping by and I hope you like my new little technique!
Happy Crafting!
Lisa

Supplies: Spray Ink: Heidi Swapp, Ranger; Die: Lawn Fawn; Enamel Dots: My Minds Eye

Wednesday, June 3, 2015

Here's the Scoop...

.... I went to go see New Kids on the Block, thanks to one of my Best Friends... yep... I still like them, and scream like a teenager when I see them in concert... bwhahahaha!  TMI? hehehe!  Anywho, Here's the scoop happens to also be my sentiment on today's card!


Supplies Used:
Stamps: The Alley Way Stamps - Slurp and Brain Freeze
Ink: Memento
Dies: Spellbinders and Pretty Pink Posh
Various Copics
Patterned Paper: Echo Park

Isn't this card just yummy?!  I'm so loving this month's release from The Alley Way Stamps, although I must admit I usually want ice cream when I start to get crafty with them, hehehe!  To create this card I started by stamping the ice cream image several times, colored them in and fussy cut them out.  I then trimmed my patterned paper panel, diecut a circle and two banners.  I decided my sentiment would look great on the yellow banner, and added a heart just because I love ice cream!  I them stacked my ice cream cone up, and ta da!!!

I am entering this guy into the Simon Says Stamp: Anything Goes Challenge

Happy Crafting!!!
Lisa

Tuesday, June 2, 2015

Sizzix Blog Hop with CardMaker Magazine - HUGE Giveaway


Hello and welcome to the Sizzix and CardMaker Magazine Blog Hop, yay!!!  I had the honor to work with the Sizzix Framelits Die Set - Card, Happy Birthday Step-Ups and the Sizzix Big Shot, which I have to say was a treat I never expected!  Thank you so much Sizzix!!!  The Big Shot has won my die cutting heart, and I know it's going to get it's work out daily.  Let's move onto all of the projects I created for this hop with the same die set...


I have created 3 very different cards for you today.  I really wanted to capture how versatile these dies can be, so that you don't feel limited/stuck with making the same type of card.  My first card is similar to that shown on the cover of this die set, and uses the dies as they are intended...
It was fun to mix and match the patterned papers with this step-up card, and the fun birthday themed dies that come with it.  I really like the look of step-up cards and various other shaped cards, but I usually don't take the time to create one, or I don't think about.  This is where this die set steps in and takes all of the guess work out.  Simply die cut and fold, and ta-da!  I also created a spot on the back of my card to write a more personal/detailed message...


Now for this next card I used softer, more feminine colors.  I also turned the scalloped rectangle dies onto their side and trimmed them to make decorative flags.  I then added a die cut cupcake in matching colors.  Finally I stamped my sentiment, and finished it all with some enamel dots...


My third card took some thinking outside the box, and I really felt like the two cupcake topper dies looked similar to clouds, so that is exactly what I turned them into!  I used the scalloped rectangles to frame and stamp my sentiment onto.


This hop will continue all week long, so I hope you will get a chance to peek at the various projects created by both the Sizzix team and the CardMaker Blog team.  From here you will visit Adrianne Surian: http://happyhourprojects.com/hello-sunshine/ tomorrow on June 3rd.  

**There is also a HUGE giveaway with this hop, so make sure you click over to the Sizzix Blog to find details on how to get yourself entered!!! Hint: Big Shot Machine, 3 die sets and a 1 year Subscription to CardMaker Magazine?! Ah-mazing!!!!


Supplies Used:
Card #1: Dies: Framelits Step-Ups (Stephanie Barnard Sizzix); Die Cutting Machine: Big Shot (Sizzix); Patterned Paper: Hootenanny 6 x 6 (My Mind's Eye); Sequins: Clear (Pretty Pink Posh), Other; Gold thread; Cardstock: Mint, Yellow and Peach; Adhesive: Multi Mono Liquid Glue (Tombow)

Card#2: Dies: Framelits Step-Ups (Stephanie Barnard Sizzix); Die Cutting Machine: Big Shot (Sizzix); Patterned Paper: Nine & Co. (Teresa Collins); Clear Stamps: Dandelion Dreams (Clearly Besotted Stamps); Ink: Versafine - Onyx Black (Tsukineko); Enamel Dots: Sweet Dots (V's Sweet Ideas), Memories (Teresa Collins)

Card#3: Dies: Framelits Step-Ups (Stephanie Barnard Sizzix); Die Cutting Machine: Big Shot (Sizzix); Patterned Paper: Cut & Paste (My Mind's Eye); Clear Stamps: All About You (The Alley Way Stamps); Ink: Versafine - Onyx Black (Tsukineko) Sequins: Evening Shoot Mix (The Ton Stamps)


Thanks so much for stopping by, happy hopping and crafting!!!
Lisa
 
BLOGGER TEMPLATE BY DESIGNER BLOGS