Showing posts with label DCWV. Show all posts

Tuesday, January 9, 2018

Thanks...

Hi!  I'm popping in to play with a few challenges, yay!!!    I was excited to see Laurel Seabrook was back to crafting, and when I saw she had a challenge too I had to join in!  Such a beautiful inspiration picture too...


And I was also inspired by the Cupcake Inspirations challenge #437:


To create this...


To create my card I wanted to go very clean and simple, and I really love the blue and white combo, so I started with Winter Sky Cardstock by AMuse Studio as my cardbase.  I then added a strip of white embossed cardstock scrap that I had in my drawer and adhered it to the center.  For snowflakes I diecut both sizes from DCWV Glitter cardstock and layered them together.  The sentiment is by Lawn Fawn, and while I cut this also from white, I felt like there was enough of a difference between this and the embossed cardstock that it didn't need anything between the two.  To finish the whole card off I add some gorgeous Iridescent Clear Crystals from Studio Katia.

Thanks so much for stopping by to visit me today and I hope I've inspired you to join in some challenges too!
Happy Crafting!
Lisa

Wednesday, November 22, 2017

It's Snowing on the CAS-ual Fridays Blog

Hello!  Today I am over on the CAS-ual Fridays Blog sharing a serene snowy scene featuring the Funky Flakes Fri-die Set and the Snowy Sayings Stamp Set.  Both of which are on sale right now! (Plus I have a discount code at the end of this post for extra savings, score!)


I am a sucker for all things snowflakes, and this die set is one of my favorites because of it's intricacies, and range in sizes.  For this card I started by diecutting several of the snowflakes out of one white panel.  I then layered the positive cut over the negative and added a piece of DCWV blue shimmer cardstock.  For my sentiment I heat embossed it with silver embossing powder and added a strip of silver shimmer cardstock.  The silver confetti sequins were the perfect finishing touch.


Thanks so much for stopping by and here is your discount code to save even more in the CAS-ual Fridays Store:


Happy Crafting!
Lisa

Wednesday, August 2, 2017

CAS-ual Friday's Sneak Peek Day 2

Woot woot!  I'm back today with a second peek at the new goodies coming to CAS-ual Fridays.  And look out cuteness... this set with have you dancing for joy (literally!).


 For this card I went totally girly and stamped these sweet images from the Tutu Stamp Set with light pastel colors.  And to finish it off I just had to pop it up on glittery pink cardstock!  Of course the sentiments to this set couldn't be anymore perfect, and I love that these girls are silhouette images.

Now make sure you stop by the CAS-ual Friday Blog for more inspiration, peeks at the new set and a chance to win!

Happy Crafting!
Lisa


Wednesday, June 21, 2017

Get Your Twinkle On...

This is post #1 for the day and I'm sharing a fun and super sparkly card today on the CAS-ual Friday's Blog, woot woot!


Full details on how this card came together can be found on their blog, so I hope you'll get a chance to check it out!  And before you go I have a discount code for you...


Michele also has 29 sets that are retiring, including the Twinkle Set that I've used on this card.  So get yours before they are gone forever!


Happy Crafting/Shopping!
Lisa

Thursday, April 6, 2017

STAMPlorations CAS Challenge

Hi!  Today starts a new Clean and Simple Challenge on the STAMPlorations Blog and this time we are challenging you with the twist of using any pastel color you wish.  I chose to use several pastels, even though my yellow seems a little brighter than the others hehehe...


Supplies Used: Crazy Double Running Stitch Rectangle Nesting Dies, Happy Word Die, Birthday Word Die, and Dee's Artsty Impressions: Kathryn's Big Wishes

Remember that all products are welcome in our challenges, and you can find full details on how it will works over on their blog!  I hope to see you join us!

Also don't forget to keep an eye out on the STAMPlorations Store as new things are always coming in!  Plus I have a discount for you to use, woot woot!

CODE: STAMPGIRLLISA   This will save you 20% off your total purchase!

Happy Crafting/Shopping!
Lisa

Thursday, February 23, 2017

A DIY Fairytale Dream Cardmaking Kit


Hello! It is Lisa Lahiff here from the DCWV Social Media Design Team, and I have one Fairytale of a project to share with you today. When I was looking through my new stacks I came across the Fairytale Dreams Stack (available at JoAnns Stores) and I was inspired immediately! Not only is the stack full of beautiful patterns and sweet glitter designs, but it has a wonderful source of inspiration on it's front cover. You can always find these types of photos on the front covers of each stack, giving you new ideas and ways that the stack can be used. I was drawn to the pretty gift box, with what looked like a DIY card making kit on the inside. I decided to take this idea and make it my own. My daughter loves everything there is about fairytales and princesses, plus she loves to craft with me so I thought this would be the perfect gift for her!


Since I was making it for a child, I decided to switch the box to gift bags, that eventually were turned into purses.  Because, let's face it every Princess needs a purse to carry with her.  Both purses were made out of card stock found in the Stack and with the help of my Cricut® Explore Air2.  Tip: When cutting this type of cardstock I set my machine right in between the poster board and bonded fabric cut setting to ensure a clean cut, especially on the glitter card stock sheets.  

The card kit was the next thing to come together.  I started by selecting my card stock and the pieces I would use to create embellishments.


And these are the pieces that ended up being included in the kit.


Isn't it amazing how much I was able to get out of this stack?  And I still have half the stack left to use!  LOVE it!  And here is a peek at all of these things put together and being used by my own little princess...


And I would have to say that this DIY Card kit was a success!

I can't wait to see what inspires you when you create with your DCWV Stacks!
Happy Crafting!
Lisa

Friday, February 10, 2017

Hello Lovely... A Layout with DCWV

Hello!  Today I'm going to share a few step out photos on how my Ballerina Layout came together here and on the DCWV Blog...


First I want to let you know which stacks I used: The Ultimate Tag Stack and the Happy Day Stack. I LOVE the Ultimate Tag Stack, and it is a must in my craft room because it is so versatile.  Plus, if you already own some DCWV stacks this is a great one to use for extra embellishments and more.

My first step was to work on my background.  I wanted to add some matching color to help my grid design and photos pop.  To do this I used Martha Stewart Gesso in White and Multi-Surface Pearl Paint in Pink Taffeta.  I also added a few gold streaks.  I applied all of this with a mix of my finger and an old gift card, but if you don't like the mess feel free to break out some brushes.  Once this was all dry I adhered it to gold foil striped paper from the Happy Day Stack and then onto a piece of Kraft.


Next, I created a grid design by trimming out similar panels from the Ultimate Tag Stack and lining them up on my background.


Finally, I added my photos onto a mix of patterned papers, tag, and a pink doily that came from the Paper Lace 6 x 6 Stack (this one is available at Michaels).  I then used various pieces from the stacks to fussy cut and adhere as embellishments.


Thanks so much for stopping by today!  Keep your eyes peeled for more projects and photos of the newest DCWV products that are arriving daily to your craft stores!

Happy Crafting!
Lisa

Thursday, January 26, 2017

Easy DIY Treat Tags with DCWV

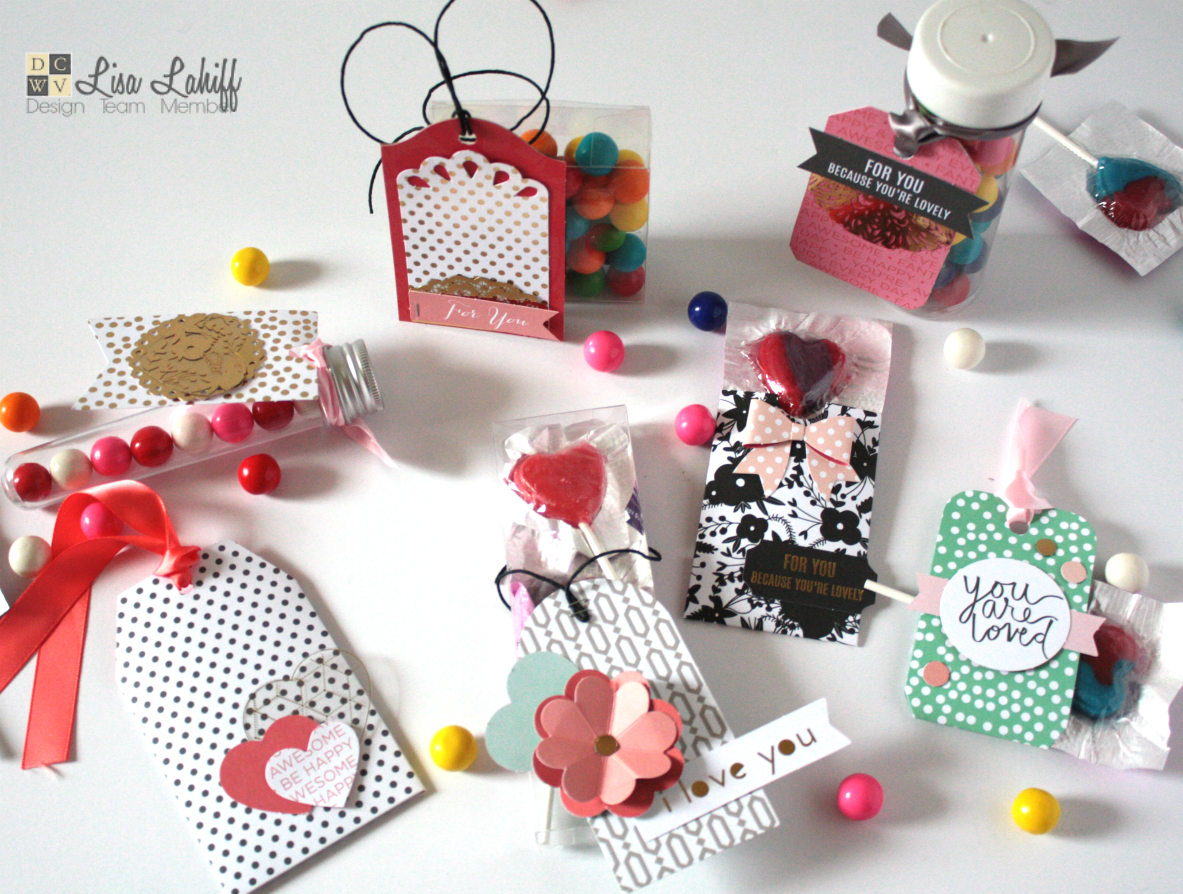
The DIY Project Stack®: Tags (available at your Michaels Store) is another one of those stacks that just makes life simpler, while still adding that personalized touch!  With Valentine's Day just around the corner I tend to create lots of goodie bags, and I thought these tags would make it easy to keep track of where each goodie bag is going. Check them out…


These tags went together quickly as all you have to do is punch them out and embellish! Plus the touch of gold foil is just drool worthy. Here is a peek at what my tags started out looking like…


And with a few embellishments they turned into these…


And finally into this...


Thanks so much for stopping by today and Happy Crafting!
Lisa

Wednesday, January 11, 2017

2017 #Goals: A Layout

Hi!  Since it is a new year, I've been doing what so many others have been doing and that means making some Goals for myself.  I thought it would be fun to type my goals up and add them to a layout with a photo of myself, take a peek...

This layout was created using the DCWV Royal Gypsy Paper Pad and the DIY Project Stack: Envelopes, both of which are available at your local Michaels Stores.  I love the colors blue and gold and I found the patterns fun and graphic so I just went with it.  I didn't really want my typed up goals to be on full display, so I thought adding an envelope would be a perfect way of keeping them accessible without sticking them straight on the paper.


The feathers and flower were fussy cut and the other cuts came from my Cricut® using some Gold Foil.  Thanks so much for stopping by today and we would love to hear what some of your goals for the New Year crafty or not!

Lisa


Friday, December 2, 2016

DCWV Light Up Terrariums!!! Say WHAT?!

Ahhh!!!  Evertime I get a new stack from DCWV I think, this stack is so awesome, I love it, it's my favorite!  And I'll be darned if they didn't do it again!  Hi, it's Lisa here with you from the DCWV Social Media Design Team and today I am sharing my newest Holiday Home Decor created with the new Light Up Terrarium Stack, seriously it is too cool take a peek...


Aren't they gorgeous?!  And you would not believe how easy they go together.  These were done in about 30 minutes!  SCORE!  Here is a picture of what one of the smaller terrariums look like when popped out of it's page...


Everything is perforated for you when you first open the stack, so all you have to do is punch each terrarium out.  The scoring is also already done, so all that comes next is folding.  Finally with a few strips of strong double sided tape ( I would recommend the 1/8" size because of how small the fold lines are ) your terrarium is put together and ready to light up.  Another tip I'd like to share is that this stack comes with two light sets, I stretched my second set out to fill two of the smaller terrariums and let the cord go behind my larger one.  You could use both sets in the larger terrarium and instead use small fake tea lights in the other terrariums, or mix and match however you like it!  Also note that you will want to run the batter pack out one of the bottom corners, so make sure you slide your lights in leaving one side open until you have the batter pack outside of your terrarium then you can seal that side up too.

And there you have it, a wow factor to your Holiday Home Decor, bragging rights to tell everyone that you made them yourself, and still plenty of time in the day to freak out about other Holiday happenings hehehe!


Happy Crafting!
Lisa

Thursday, December 1, 2016

Retro Ornament Style with CAS-ual Fridays

Hello!  It's me again!  And I'm excited to share this super cute and retro Christmas card with you here and on the CAS-ual Fridays Blog...


To create this card I started by diecutting my ornament using foil cardstock, Ornament Tag Fri-die set, and the Funky Flakes Fri-die set. I wanted to create a retro-ornament feel so I die cut the smaller circle slightly to the lower right side of the larger circle and inlaid the two together. I then added my snowflake ontop and finished it off with the ornament topper and hanger. The sentiment is from the Snowy Sayings Stamp Set.

The paper I used is from the DCWV Mercury Glass Stack.  

Thanks so much for stopping by and Happy Crafting!
Lisa

Wednesday, November 16, 2016

3 in 1 with DCWV

Hello!  It is Lisa Lahiff here with you today from the DCWV Social Media Design Team and I'm super excited to share this fun set of 3 Holiday Projects that were created using the new Cranberry Christmas available at Michaels stores.


I am always so excited when I can use just one stack to make so many different projects.  Here I have created a framed decor piece, a greeting card and a tag.  This stack has such a gorgeous mix of silver and gold foiling with classic Christmas patterns and colors, that in no time at all I had a cohesive gift set ready for packaging!
To really show off the papers in this stack I've taken a few individual shots for you...


Isn't that foil just jaw dropping gorgeous!  I hope I've inspired you to create your own gift sets, and please free to share your stack projects with us on any of our social media feeds!  Thanks so much for stopping by!
Happy Crafting!
Lisa

Supplies Used:
Cranberry Christmas Stack
3" Circle die cut
Branch Punch
Frame
Ribbon
Scissors
Hole Punch


BLOGGER TEMPLATE BY DESIGNER BLOGS